Dates! So important, yet so easy to forget. With Todoist, stay on top of what’s scheduled soon by adding a date and time to your tasks. And if your schedule won’t let you complete them on time, learn how to reschedule or postpone tasks to a future date.
Create recurring dates for tasks that repeat on a regular basis, like “Send Mom a birthday card every July 19” and “Take out the recycling every other Wednesday”.
Add a date
The easiest way to add a date is to type the task name and the date into the task field. The smart Quick Add will automatically recognize the date, highlight it, and add it when you save the task.
Use natural language to describe almost any date—a simple tomorrow at 4 pm to a super specific recurring date like every 3rd Tuesday starting Aug 29 ending in 6 months. Dates can go up to 150 characters long.
Pierre · Customer Experience Specialist
When using smart date recognition, you'll find that a date can sometimes be part of a task name. For example, for the task “Create monthly report”, “monthly” will automatically be highlighted as a date. Just click or tap the word to unhighlight it. You can also turn off automatic date recognition entirely.
Add a deadline
If you need to finish a task before a specific date, consider adding a deadline (deadlines are available on the Pro plan). For example, create a recurring date every 2 days at 12:00 and add a deadline {Feb 28}. As you work on this task, you will always see its deadline, while the recurring date will change. To learn more about deadlines, check this article.
Add a date using the scheduler
If you need to assign a date to an existing task, use the scheduler:
- Click a task. The task view will open with all the task details.
- Click Date on the right-hand side. The scheduler will appear.
- Scroll through the calendar and select the date for the task.
Quick tip
- Tap a task. The task view will open with all the task details.
- Tap Date. The scheduler will appear.
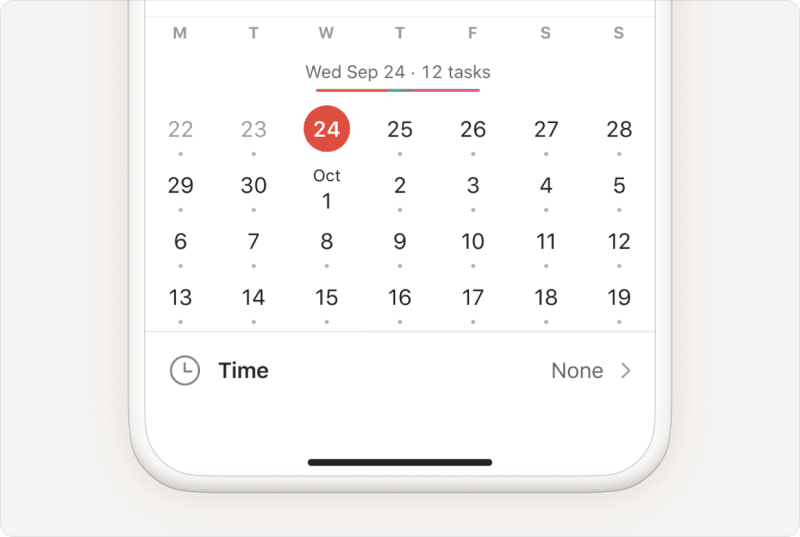
- Tap Type a date and enter the date using natural language. You’ll see the date and the number of tasks already scheduled on that date.
- Tap Done at the top-right to confirm.
Quick tip
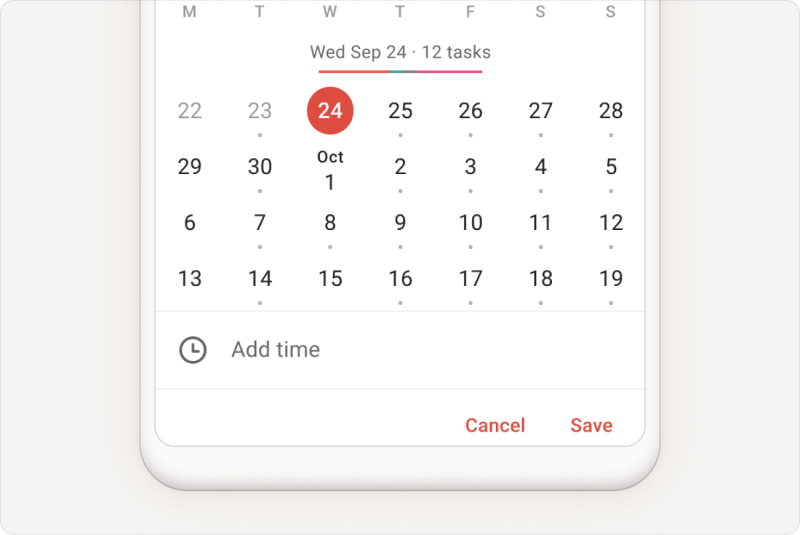
In the scheduler, you'll see a colored bar above the calendar that represents the number of tasks scheduled for that day and which project they belong to. If the bar's quite long, spread out your workload by rescheduling tasks to future dates.
- Tap a task. The task view will open with all the task details.
- Tap Date. The scheduler will appear.
- Tap the pencil icon and enter the date using natural language. You’ll see the date in day and month format, as well as the number of tasks already scheduled on that date.
- Tap the submit icon to confirm.
Quick tip
In the scheduler, you'll see a colored bar above the calendar that represents the number of tasks scheduled for that day and which project they belong to. If the bar's quite long, spread out your workload by rescheduling tasks to future dates.
Add time
Time gives each task a specific time slot in your schedule. Add time alongside the date (for example: Buy milk tomorrow 9am), or select the appropriate time using the scheduler:
- Click a task. The task view will open with all the task details.
- Click Date on the right-hand side. The scheduler will appear.
- Click Time.
- Enter the time the task is due.
- Click Save to confirm.
- Tap a task. The task view will open with all the task details.
- Tap Date. The scheduler will appear.
- Select Time.
- Assign due time to the task.
- Tap Save at the top-right to confirm.
- Tap a task. The task view will open with all the task details.
- Tap Date. The scheduler will appear.
- Select Add time. Add time to the task.
- Tap SAVE to confirm.
Note
1300 or 2330) when typing it into the
Time field of the scheduler. You'll need to enter it with a colon, such as 13:00 or 23:30.
Break it down with colors
Todoist displays dates in a variety of colors depending on how soon a task is scheduled. Here’s a breakdown:
| Color | Meaning |
|---|---|
| Red | Overdue tasks |
| Green | Tasks scheduled today but haven't gone past the due time |
| Brown | Tasks scheduled tomorrow |
| Purple | Tasks scheduled in the next 2-7 days |
| No color | Tasks scheduled in 8 days and onwards |
Write dates in natural language
There are several date formats you can type with natural language in Todoist. This will schedule the task to the specified date.
If you’re unsure if a particular date format will work, go ahead and type it after the task name. Use natural language to describe it. Todoist will likely know what you mean.
Type these natural language terms when adding a task in Todoist to schedule the task to the specified date.
| What you type: | What Todoist understands: |
|---|---|
| today | Today (tod also works) |
| tomorrow | Tomorrow (tom also works) |
| next week | The next Monday by default (this can be changed in your Settings) |
| next month | On the same date, one month later |
| next weekday | The following week's version of that weekday (see note below) |
| jan 27 | Jan 27 (27 jan, 27/1 also work) |
| 01/27/2023 | January 27, 2023 (27/01/2023, 2023/01/27, 2023-01-27 also work) |
| 27th | 27th day of the current month |
| mid January | January 15th |
| end of month | Last day of the current month |
| today at 10 | Today at 10am |
| tomorrow at 16:00 | Tomorrow at 4pm |
| Fri @ 7pm | Friday at 7pm (Friday @ 7pm, Fri at 7pm, Fri at 1900, Fri at 19:00 also work) |
| 6pm | Today at 6pm (unless 6pm has passed, in which case tomorrow) |
| in 5 days | 5 days from today (+5 days also works) |
| in 3 weeks | 3 weeks from today |
| in 2 hours | 2 hours from now |
| in the morning | At 9am |
| in the afternoon | At 12pm |
| in the evening | At 7pm |
| someday | Two months later |
| no date | Useful for adding a task when either the Today View or Upcoming View is active (both default to today's date), but you don't want to set a date. The query no due date also works. |
| later this week | Assigns a day later in the week. Changes dependent upon what day of the week it is upon the time of entry. |
| Friday | The next Friday to occur |
| next Friday | The second Friday to occur |
| next weekend | The second-next Saturday to occur |
| this weekend | The upcoming Saturday |
| next year | Jan 1 of next year |
| 27/1 | Jan 27 |
| 3rd friday jan | The third Friday in next January |
| tom morning | Tomorrow at 9am (tommorning also works) |
| tom afternoon | Tomorrow at 12pm (tomafternoon also works) |
| tom evening | Tomorrow at 7pm (tomevening also works) |
| tom night | Tomorrow at 10pm (tomnight also works) |
| 50 days before new year's eve | 11 November (this is particularly useful for setting Reminders) |
| 6 weeks before 21 Jul | 9 June |
| 28 days after 21 July | 18 August |
Todoist interprets “next [weekday]” based on where you are in the week.
If the weekday you mention hasn’t happened yet this week, Todoist understands “next” as the one in the following week. If the weekday has already passed, Todoist schedules it for the next upcoming occurrence.
For example, if today is Monday, October 20, and you type “next Tuesday,” Todoist will skip the Tuesday of this week (October 21) and schedule it for October 28, which is the Tuesday of the next week.
When you need a task to repeat daily, weekly, monthly or on whatever schedule you'd like, you can set a recurring date. Click here to learn all about how to set recurring dates like daily, weekly or every 3 months.
Huge thanks to our Todoist ambassador Leighton Price for providing some examples for this article.
Change Next week and Weekend settings
You can change the day Todoist interprets as next week or this weekend.
- Click your avatar in the top-left.
- Select Settings.
- Open the General tab.
- Scroll down to the Date & time section.
- Click the Next week or Weekend menus and select the days you want Todoist to interpret as next week or this weekend.
- In Todoist, tap the Browse tab in the navigation bar.
- Tap the gear icon at the top-right.
- Select General.
- Scroll down to the Date & time section.
- Tap either the Interpret "Next Week" As or Interpret "Weekend" As options to change the day Todoist interprets as next week or this weekend.
- In Todoist, tap the Browse tab in the navigation bar.
- Tap the gear icon.
- Select General.
- Scroll down to the Date & time section.
- Tap either the Interpret "Next Week" As or Interpret "Weekend" As options to change the day Todoist interprets as next week or this weekend.
Remove a date
- Click a task. The task view will open with all the task details.
- Click Date on the right-hand side. The scheduler will appear.
- Select No Date to remove the date.
Quick tip
no date or no due date in the Date field. Then, press ↵ Return (macOS) or Enter (Windows) to remove the date from the task.
- Tap a task. The task view will open with all the task details.
- Tap the existing date. The scheduler will appear.
- Select No Date to remove the date.
- Tap a task. The task view will open with all the task details.
- Tap the existing date. The scheduler will appear.
- Select No Date to remove the date.
Get started
Set your projects up for success by adding dates and due time to your tasks! If you’re having trouble scheduling dates or due time, or using the scheduler, get in touch with us.