The secret to remembering everything on your task list is letting Todoist do the heavy lifting for you. Whether it’s an urgent monthly report deadline or a friend’s surprise birthday bash, adding a reminder ensures you stay on track. This guide explains how to set up automatic, custom, recurring and location-based reminders so you never miss a thing.
Understand reminder types
In Todoist, you can add different kinds of reminders to a task:
- Automatic reminders: A reminder that’s added by default whenever a date and time is scheduled to a task. This is based on your Reminders settings
- Custom reminders: A reminder based on a specific date and time, or the amount of time before a task is due
- Recurring reminders: A reminder that notifies you on a recurring basis (for example:
ev Tuesday 7:00) - Location reminders: A reminder that notifies you when you’ve arrived at a specific location. Learn more about location reminders
When you’ve identified which reminder suits your needs, here’s how to add them to your tasks.
Set up automatic reminders
When you add a date and time to a task, Todoist can automatically add a task reminder. You can adjust how long before the task date Todoist will remind you, as well as the type of notification you’ll receive, in your Reminders settings.
- Click your avatar at the top-left.
- Select Settings.
- Click the Reminders tab.
- Click the Automatic reminders menu.
- Select how long before the task’s time to receive a notification.
- Turn on the type of notification you’d like to receive:
- Desktop notification: Get notifications on your desktop computer.
- Mobile notification: Get notifications on your mobile device.
- Emails: Receive an email notification at your account email address.
Add an automatic reminder
To add an automatic reminder, always add a date and time to the task. This is because these reminders are relative to the time of a task.
Turn automatic reminders off
If you no longer want Todoist to add reminders automatically, click the Automatic reminders menu and select No automatic reminder.
- Tap Browse at the bottom-right.
- Tap the gear icon at the top-right.
- Tap Reminders.
- Tap Remind Me Via and choose which notification you’d like to receive:
- Mobile Notification: Get notifications on your mobile device.
- Desktop Notification: Get notifications on your desktop computer.
- Email: Receive an email notification at your account email address.
- Tap back to Reminders.
- Tap Automatic Reminders and select a relative time from the list.
Quick tip
Add an automatic reminder
To add an automatic reminder, always add a date and time to the task. This is because these reminders are relative to the time of a task.
Turn automatic reminders off
If you no longer want Todoist to add reminders automatically, click the Automatic Reminders menu and select No automatic reminder.
- Tap the gear icon at the top.
- Tap Reminders.
- Tap Remind Me Via, select the type of notification you’d like to receive:
- Tap Reminders.
- Tap Remind Me Via and choose which notification you’d like to receive:
- Mobile Notification: Get notifications on your mobile device.
- Desktop Notification: Get notifications on your desktop computer.
- Email: Receive an email notification at your account email address.
- Tap back to Reminders.
- Tap Automatic Reminders and select a relative time from the list.
Quick tip
Add an automatic reminder
To add an automatic reminder, always add a date and time to the task. This is because these reminders are relative to the time of a task.
Turn automatic reminders off
If you no longer want Todoist to add reminders automatically, click the Automatic Reminders menu and select No automatic reminder.
- Tap Browse in the bottom-right.
- Tap the gear icon in the top-right.
- Select Reminders.
- Tap Remind Me via, select the type of notification you’d like to receive:
- Mobile push notification: Get notifications on your mobile device.
- Desktop push notification: Get notifications on your desktop computer.
- Email: Receive an email notification at your account email address.
- Tap OK.
- Tap Send automatic reminders... and select a relative time from the list.
Quick tip
Add an automatic reminder
To add an automatic reminder, always add a date and time to the task. This is because these reminders are relative to the time of a task.
Turn automatic reminders off
If you no longer want Todoist to add reminders automatically, click Send automatic reminders and select No default reminder.
Add a custom reminder
Add custom reminders that’ll remind you on a specific date and time, or before a task is due. If you’re on Todoist Pro or Business, you can add multiple custom reminders, so you get notifications at any time of the day.
Add a Date & Time reminder
- Click a task to open the task view.
- Click Reminders on the right side. A small window will appear.
- Select the Date & time tab.
- Select the hour you want to receive the notification, or use natural language to enter the date and time (for example:
Mon 19:00) - Click Add reminder.
Add a Before task reminder
- Click a task to open the task view.
- Click Reminders on the right side. A small window will appear.
- Select the Before task tab.
- Select how long before you’ll get a notification about the task in the menu. You’ll get a notification when it’s time for this task to be due.
- Click Add reminder.
In the Todoist mobile apps, you can only add a Date & time reminder. Here’s how to add them to your task:
- Tap a task. This opens the task view.
- Tap the Reminders chip. You’ll see suggested reminders that you can select from.
- Tap Custom Date & Time. A scheduler will appear.
- Select the date of the reminder, or use natural language to enter the date and time (for example:
Mon 19:00). - Tap the Time menu and select the hour of the reminder.
- Tap Save at the top-right. The custom reminder is added to the list.
- Tap Done.
In the Todoist mobile apps, you can only add a Date & time reminder. Here’s how to add them to your task:
- Tap a task. This opens the task view.
- Tap the Reminders chip. You’ll see suggested reminders that you can select from.
- Tap Custom Date & Time. A scheduler will appear.
- Select the date of the reminder, or use natural language to enter the date and time (for example:
Mon 19:00). - Tap the clock icon and select the hour of the reminder.
- Tap OK. The custom reminder is added to the list.
- Tap OK again to confirm.
- Close the task view.
Assign a reminder
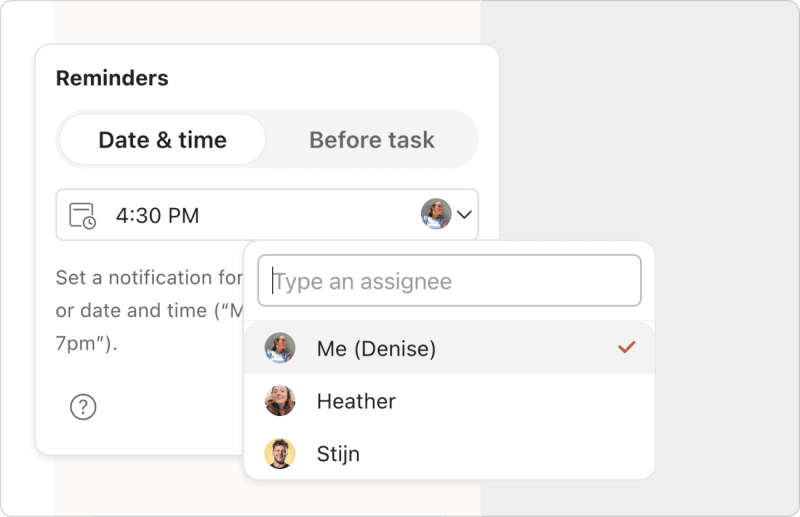
If you’re working on a shared project with other people, you can assign reminders to specific collaborators, so they don’t miss tasks that need their input.
- Click a task to open the task view.
- Click Reminders on the right side.
- Click the avatar beside the reminder.
- Select the appropriate person from the assignee list.
- Tap a task to open the task view.
- Tap the Reminders chip.
- Select Custom Date & Time.
- Tap Notify.
- Select the person to assign them to the reminder.
- Tap a task to open the task view.
- Tap the Reminders chip.
- Select Custom date & time.
- Tap Notify.
- Select the person to assign them to the reminder.
Add a recurring reminder
Got a busy schedule and you can’t always check Todoist? Add a recurring reminder, so you get notifications about your tasks on a regular basis.
Quick tip
ev Mon 8:00) or a Before task reminder, which fires before each occurrence.
- Click a task to open the task view.
- Click Reminders on the right side. A small window will appear.
- Select the Date & time tab.
- Enter the recurring date and time for the reminder (for example:
ev Mon 8:00) - Click Add reminder.
- Make sure the task has a date and time.
- Tap the task. This opens the task view.
- Tap the Reminders chip.
- Tap At time of task.
- In the Date & Time section, tap Add.
- In the text field at the bottom of the page, type something like
every day at 11 AM, then tap the search icon. - Optionally, toggle on Urgent before saving.
- Tap Save. This adds the recurring reminder to the list.
- Tap Done.
Urgent reminders display a full-screen alarm that cuts through silent and Do Not Disturb modes, so you don’t miss the things that matter most. They’re available only on Todoist for iOS 26 and later – you won’t see the Urgent toggle on Android, web, or desktop. Learn how to use urgent reminders on iOS.
Recurring reminders aren’t supported in Todoist for Android. Switch to the Todoist web app or desktop apps, and add a recurring reminder to your task.
Use shortcuts to create reminders
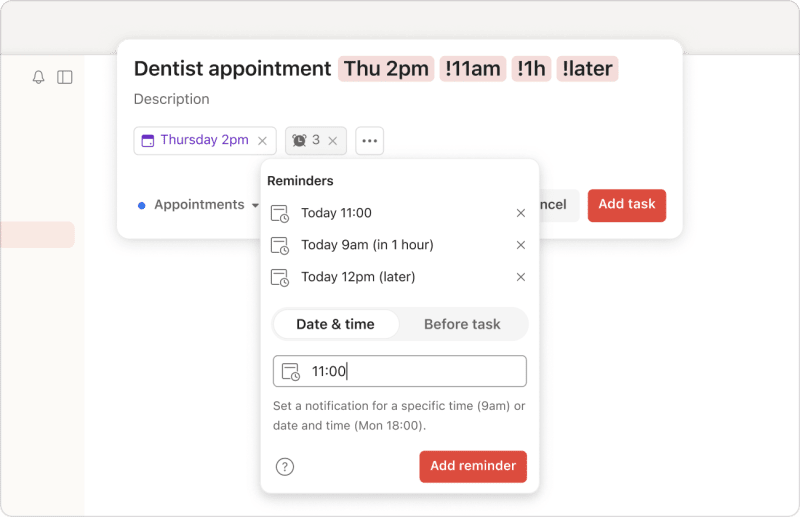
If you're on Todoist Pro or Business, use the exclamation mark ! as a shortcut to add a reminder as you’re creating or editing a task. In Quick Add, enter an exclamation mark ! in the task name followed by the desired time for the reminder.
Samara · Customer Experience Specialist
Get notified at a specific time (like !3pm), after a certain amount of time has passed (like !2h), or at a certain amount of time before your task is due (like !30mb or !30min before). Todoist will even understand when you add a reminder for !later (4 hours later) or !tomorrow (the next day at 9:00 AM).
Here is the list of supported reminders:
| Shortcut | Example | What it does |
|---|---|---|
| !30m | Work meeting today 10:30 !30m | Reminder set for 30 minutes from current time (time when added to task) |
| !2h30m | Call the hotel to confirm reservation !2h30m | Reminder set for 2 hours and 30 minutes from current time (time when added to task) |
| !0mb or !0min before | Lunch at restaurant 1pm !0mb | Reminder set at the exact time (0 minutes before) |
| !later | Clear the trash !later | Reminder set for around 4 hours later from current time (rounded down to the closest hour) |
| !1hb or !1h before | Prepare meeting agenda 11am !1h before | Reminder set 1 hour before it's due Note: When added to tasks without time, this will create a reminder set 1 hour from the current time. |
| !11am !1hb !3hb | Dentist appointment Thu 2pm !11am !1hb !3hb | Multiple reminders set for: the next instance of 11 AM, 1 hour before it's due, and 3 hours before it's due |
| !6pm | Get groceries after work !6pm | Reminder set for the next instance of 6 PM |
| !30mb or !30m before | Take vitamins every day at 9am !30mb | For each instance of the task, reminder is set for 30 minutes before 9 AM |
| !tmr 3pm | Hand in report before EOD !tmr 3pm | Reminder set for tomorrow at 3 PM |
| !Mon 9am | Check schedule for the week !mon 9am | Reminder set for Monday at 9 AM |
| !every 5pm | End of day review every day !every 5pm | Reminder set for every day at 5 PM |
| !every sat 9am | Water plants every weekend !every sat 9am | Reminder set to every Saturday at 9 AM |
| !every 2 hours | Check on Hariette's progress !every 2 hours | Reminder set to every 2 hours |
Warning
Best practices for reminders
Reminders keep you from missing out on important events and scheduled tasks. Make the most out of reminders by following these best practices:
Use natural language
Save yourself from extra clicks or taps by entering reminders using natural language. Any of the dates and times used to schedule your tasks also work for reminders.
Let Todoist suggest reminders
Todoist takes the load off your shoulders by proactively suggesting helpful reminders. If you’re using the web app or desktop apps, enter an exclamation mark ! to see a list of reminder suggestions. If you’re on your mobile device, suggestions will appear right away when you tap the Reminders chip in the task view.
Snooze the reminder for later
If you can’t work on a task at the time you get the notification, pull out your mobile device and snooze the reminder for later. Todoist will make sure to send the next notification at your preferred interval.
Here’s how to set up your snooze settings in Todoist:
There’s no option to snooze a reminder in either the Todoist web app or desktop apps.
- Tap Browse at the bottom-right.
- Tap the gear icon at the top-right.
- Select Reminders.
- Tap When Snoozed… and select your preferred interval.
- Tap Browse at the bottom-right.
- Tap the gear icon at the top-right.
- Select Reminders.
- Tap When snoozed… and select your preferred interval.
Get in touch
If you’re having trouble adding, changing, or removing reminders in Todoist, get in touch with us.