UI Extensions are modules that can be added to an integration to extend the Todoist UI with additional functionality.
注
How do they work?
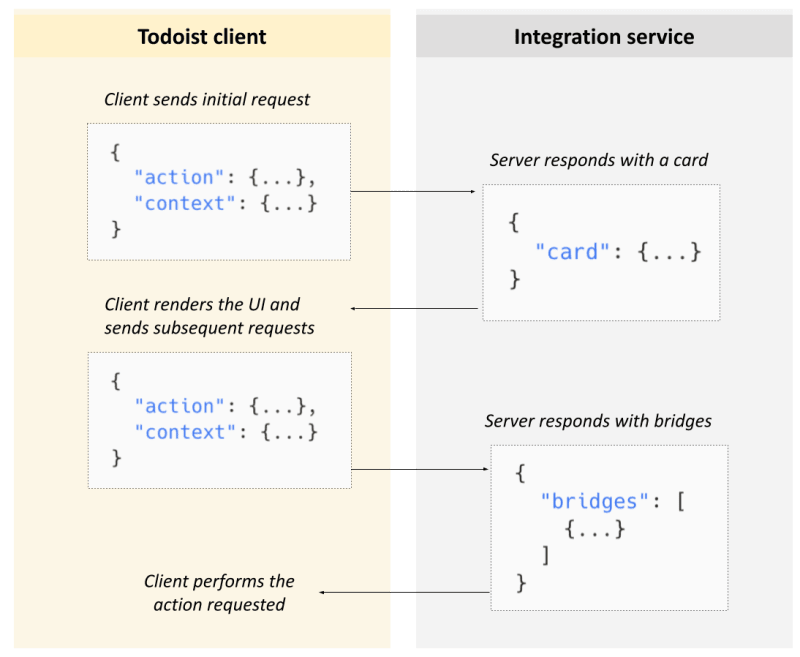
UI Extensions work via a turn-based model. When a UI Extension is invoked:
- A modal is opened in the Todoist client.
- The Todoist client sends an initial request to the integration service.
- The integration service receives the request, performs some operations (like querying some APIs or performing some calculations), and responds with a UI and/or requests for the client to execute a/some specific action(s).
- The client renders the UI and executes the requested actions.
- The user interacts with the UI and the Todoist clients sends another request (with some instructions) to the integration service.
- As in step 3, the integration service processes the request and the cycle continues until the user closes the modal or the integration service responds with a request to close the integration modal.
More specifically, a request from the client includes:
- An
action(optionally with some parameters) - The
context(details about the client and the task or project it's invoked on)
A response from the integration service includes a card, instructions to render a certain UI, and/or bridges, requests for the client to perform some action, like firing a notification or adding some text to a composer.
Cards
Doist card example:
{
  "card": {
    "type": "AdaptiveCard",
    "body": [{
        "text": "Welcome, my friend!",
        "type": "TextBlock"
    }],
    {...}
  }
}
UI Extensions return UIs in the form of Doist Cards, which are returned in the response from the extension and which the Todoist client will render for the user. Doist Cards are based on Adaptive Cards.
Bridges
Bridge example:
{
  "bridges": [
    {
      "bridgeActionType": "display.notification",
      "notification": {
        "text": "Hello, user!",
        "type": "success"
      }
    }
  ]
}
UI Extensions can also return Bridges. These are requests for client-side actions and they instruct the client to do specific actions on the extension' behalf, such as injecting text into the composer or displaying a notification.
What kinds of UI Extensions are there?
We currently support three types of UI Extensions:
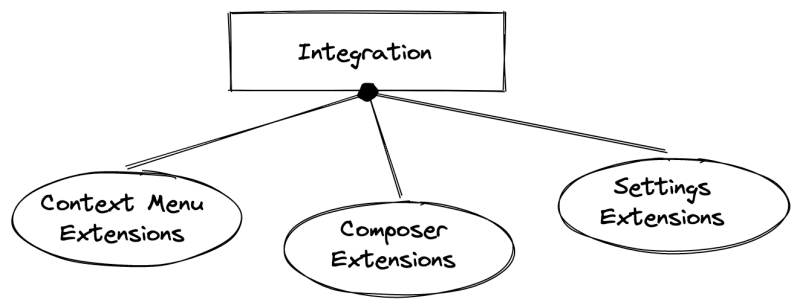
Context Menu Extensions
Installed context menu extensions are shown in the project or task context menu. When triggered, they query your integration's server for UI to render or action(s) to perform.
Templates, Google Sheets and Conversation Starters are all examples of integrations with Context Menu extensions.
For example, the Templates integration has 2 project context menu extensions. When a user selects one of these extensions from a project's context menu, a UI is rendered that displays templates that the user can import into their project. When a user interacts with the UI, the integration reacts by creating tasks in the project.
Composer Extensions
Installed composer extensions are shown in the composer extensions menu, which the user can access while adding tasks, sub-tasks or comments. Like context menu extensions, they query your integration's server for UI to render or action(s) to perform. Composer extensions have the ability to append text to a task name, description, or comments.
Settings Extensions
Settings extensions appear in the Integration Settings within Todoist. Like context menu extensions, they can render UI and communicate with your integration's server. An integration can have only one settings extension.
For example, the Habit Tracker integration has a Settings extension. When the settings for the Habit Tracker integration are opened, the Settings extension renders a UI with integration-specific settings that the user can change.
Extension lifecycle example
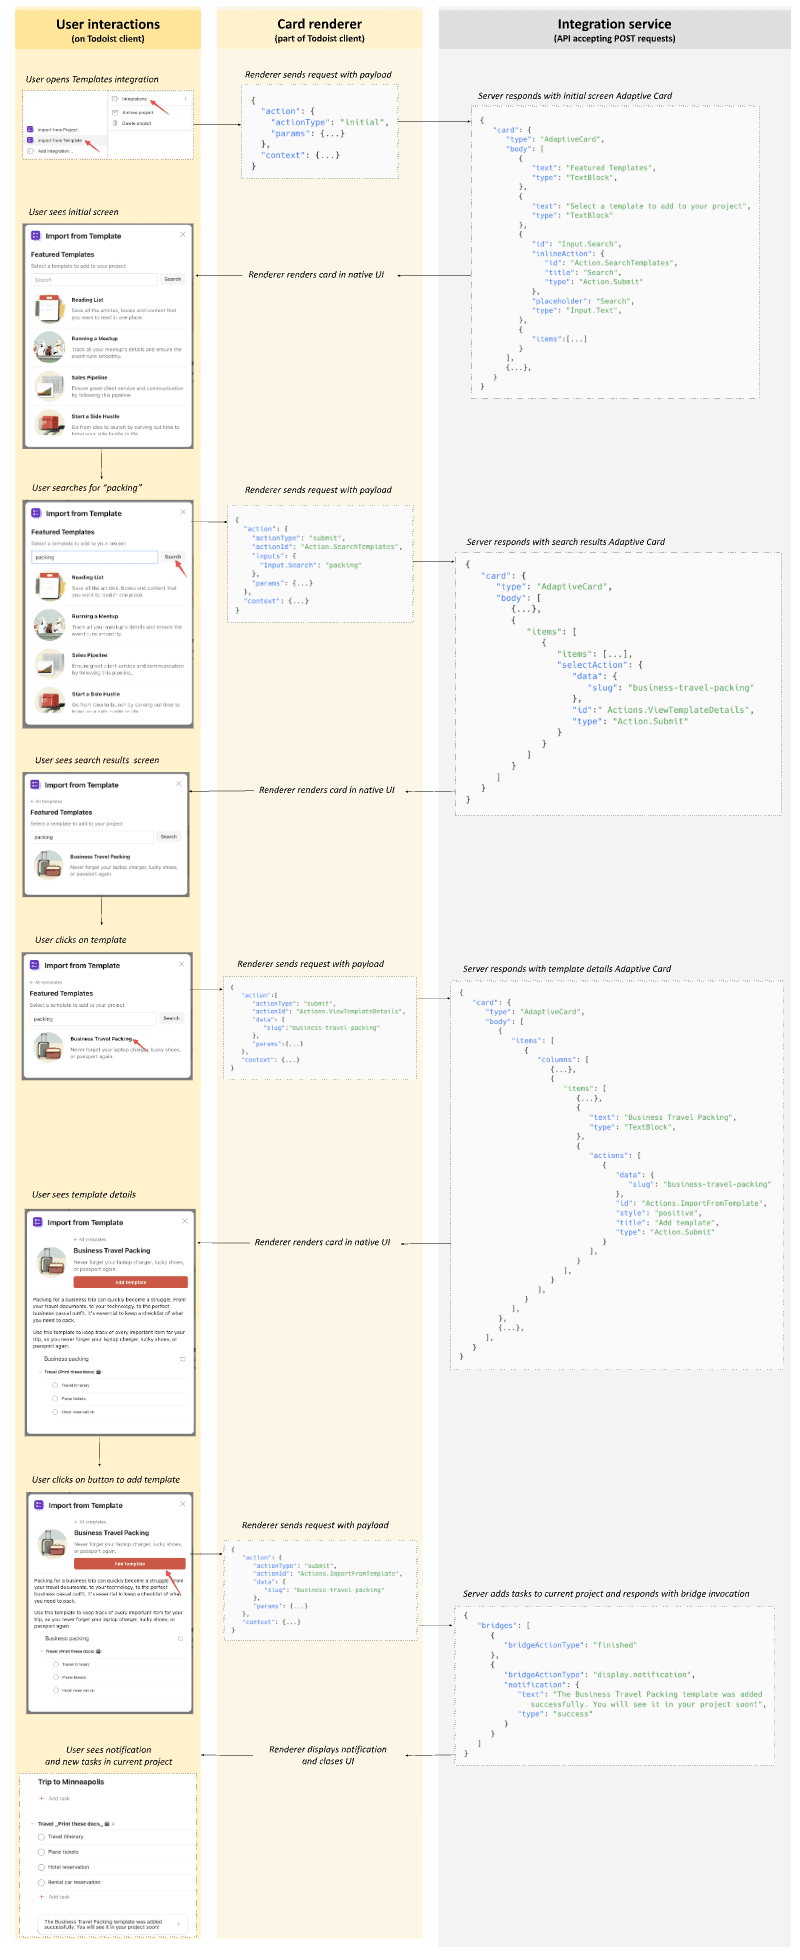
Below, you can see the "Import from Template" extension flow (part of Templates), from beginning to end.
When a user selects the extensions from a project's context menu, the following flow gets triggered:
- The Todoist client sends an initial request to the integration service.
- The integrations service responds with a UI (in the form of a
card). - The client renders the UI (displays templates that the user can import into their project).
- When the user interacts with the UI by searching for templates, the client sends a new request to the integration service.
- The integration service processes the request and the cycle continues until the user settles on a template to import or exits the extension.
- If the user issues the request to add a template to their current project, the integration reacts by creating tasks in the project and returning 2
bridgesto the client:finishedmeaning that the extension should be closed.display.notificationmeaning that a toast message should be displayed to the user.
- If the user issues the request to add a template to their current project, the integration reacts by creating tasks in the project and returning 2
- Finally, the client renders the notification, closes the modal and the interaction is finished
If you'd like to see the complete payloads, you can install and use the Templates extension in Todoist and inspect the traffic occurring when interacting with the extension.
Get in touch
If you still have questions about UI extensions or want to learn more, get in touch with us.