26 Little-Known Todoist Features

Test your Todoist knowledge and pick up a few tricks along the way

Todoist is designed to be simple to use, yet powerful enough to take on your most ambitious projects. To make sure you're in the know about just how powerful Todoist can get, we’ve put together a list of 26 lesser-known features that make adding and organizing your tasks faster, more personalized, and, dare we say it, more fun.

We’ve got a healthy mix of free and paid features below. But don’t worry: if something requires a paid plan, we’ll make it clear by using the unlock emoji 🔒.

Read on to learn something new, whether you’re a seasoned Todoist veteran or just getting started today.


Filters, Views & AI-Powered Productivity

1. See every task in a project with filter queries

Filters are a powerful way to create your own custom task views that fit your specific workflow. But getting the queries just right can be tricky. The double hashtag syntax is a little-known tag that lets you see a project and its sub-projects in one place.

Let’s say you have split your “Work” project into several sub-projects like “Design”, “Development”, “Meetings”, etc. To build a “Today’s Work Tasks” view, simply use the filter query “today & ##Work” to see all of the tasks in your Work project and any of its sub-projects that are also due today. This kind of custom view makes it easier to focus on just the tasks you can work on right now and keeps all other tasks out of sight for later.

Here are a few handy filters to try out:

If you need to

Use this

See all tasks that are overdue or due today that are in the “Work” project

(today | overdue) & #Work

See all tasks that don’t have a date

no date

See all tasks that don't have a time

no time

See all tasks that are due in the next 7 days and are labeled @waiting

7 days & @waiting

See all tasks created more than 365 days ago

created before: -365 days

See all tasks you assigned to others

assigned by: me

See all tasks assigned to Becky

assigned to: Becky

See all tasks created by you

added by: me

See all tasks created by Becky

added by: Becky

See all tasks in shared projects that haven’t been assigned to anyone

shared & !assigned

See all sub-tasks

subtask

See all parent tasks

!subtask

2. Use filter queries to manage delegated tasks
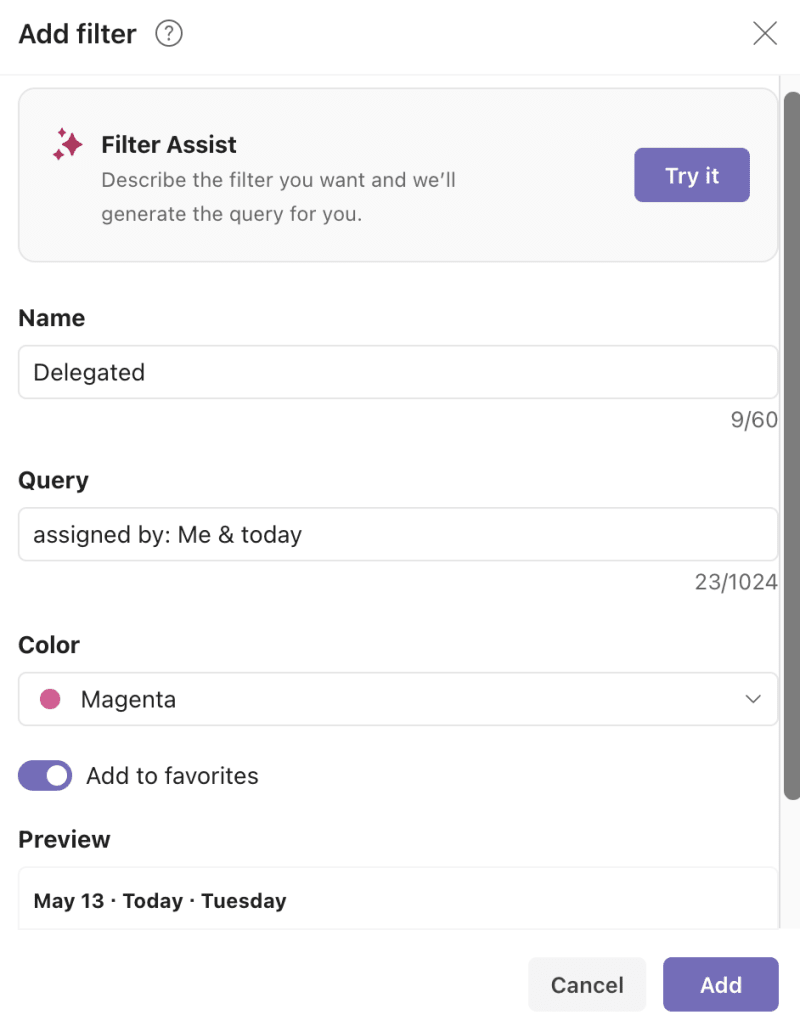
Whether you’re collaborating with coworkers, splitting the chores with housemates, or keeping track of errands with a loved one, it’s easier to get things done when you can share the workload.

In Todoist, shared projects make it easy to assign tasks, set due dates, and discuss details in comments. But once a task is delegated, it’s easy to forget to follow up on it. That’s where “assigned to” and “assigned by” filter queries come in handy.

See every task that’s assigned to other people by using “Assigned to: Others”. You can also see the tasks assigned to just one person with a query like “Assigned to: Erica”.

See every task you’ve assigned to others by using “Assigned by: Me”. In one click, you can see every outstanding task you’ve assigned to others, and follow up in the task comments if need be (hopefully everything’s right on time, though).

Note

Tip: You can add your new filter view to your Favorites so it shows up above your project list inside your main navigation menu. When you get to work, your work tasks for the day will be just a quick click away.

3. Craft helpful filters with Filter Assist 🔒
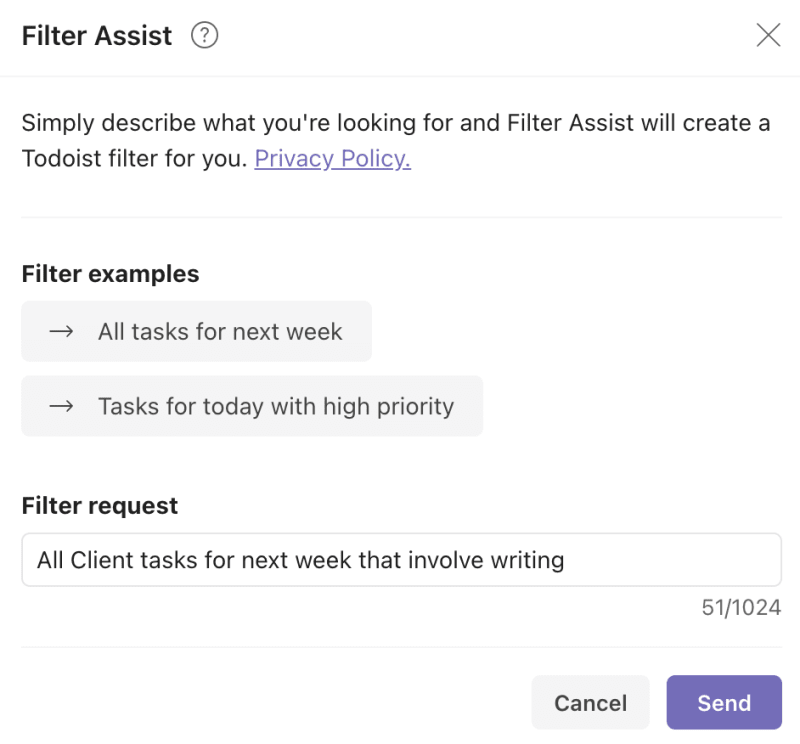
Filters can be incredibly helpful for organizing tasks and surfacing important or time-sensitive items. But it’s tough to unlock their true potential if you don’t speak their language.

Filter Assist can help. It automatically generates filters based on your natural language description of what you want.

To access Filter Assist, go to your Filters & Labels view and add a new filter. Click the Try it button next to Filter Assist. Then, explain what you want.

You’ll see a preview of relevant tasks so you can make sure the filter shows what you want. From there, you can either refine the filter or add it to your dashboard.

Note

Filter Assist is a paid feature in Todoist’s Pro plan. Compare Todoist’s plans and see which one is right for you.

4. Use keyboard shortcuts to speed up task management

Keyboard shortcuts take a bit of time to learn and master. But for actions you take multiple times a day every day, it’s well worth the effort.

Here are some of the Doist team’s favorite keyboard shortcuts:

  • Neil, Product Marketer: “I use keyboard shortcuts to quickly edit a lot of tasks on big product launch projects. I use ctrl+up (cmd on mac) and ctrl+down to quickly move up and down and edit tasks.”

  • Gonçalo, CTO: “I use ctrl + left/right to indent tasks. It makes adding a full hierarchy with sub-tasks a breeze, without ever taking the hands off of the keyboard.”

  • Me, Editor: “I love “q” to open up Quick Add and quickly jot down whatever’s on my mind. I also use “Ctrl + ⌘ + A” to pull up Quick Add from anywhere on my Mac without having to go to the Todoist app. It makes adding new tasks as soon as they come to me second nature.”

Explore all Todoist keyboard shortcuts →

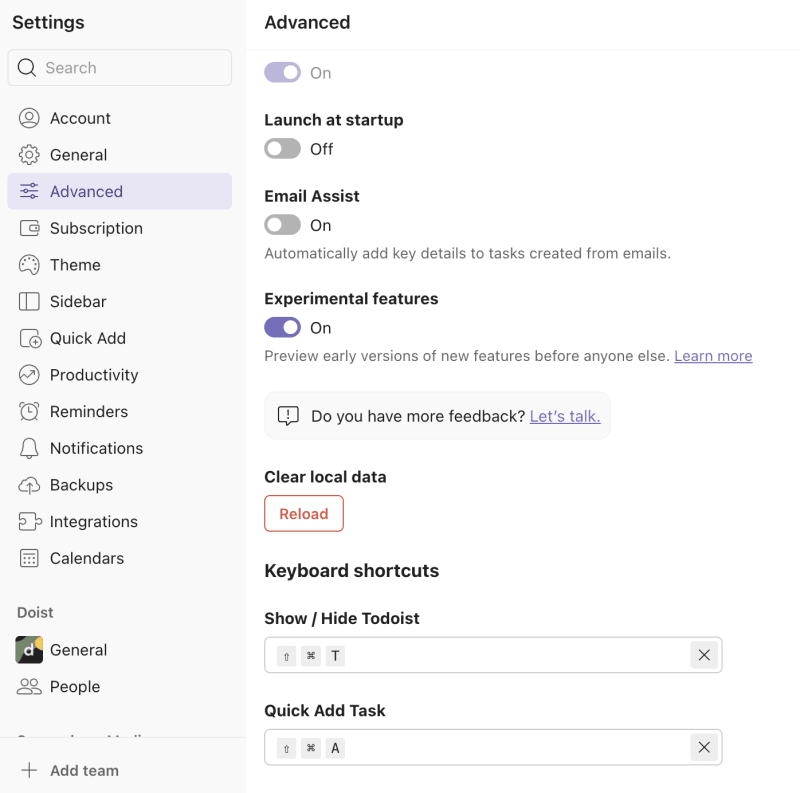
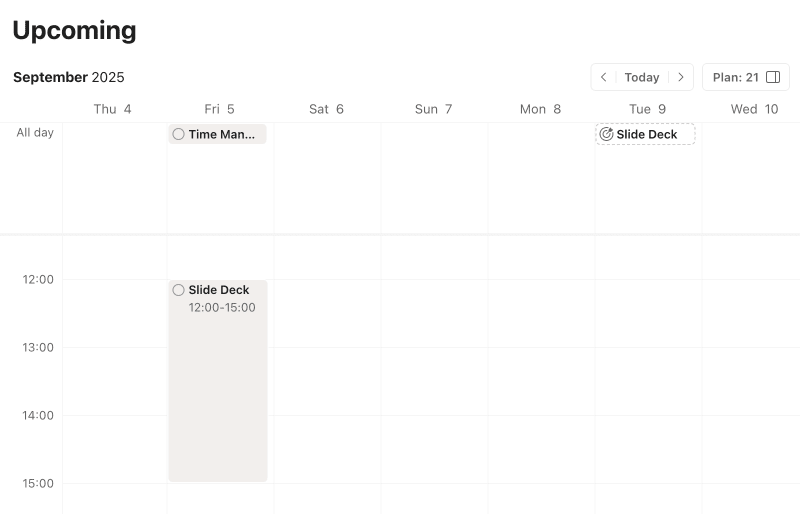
5. Block time with the calendar layout 🔒
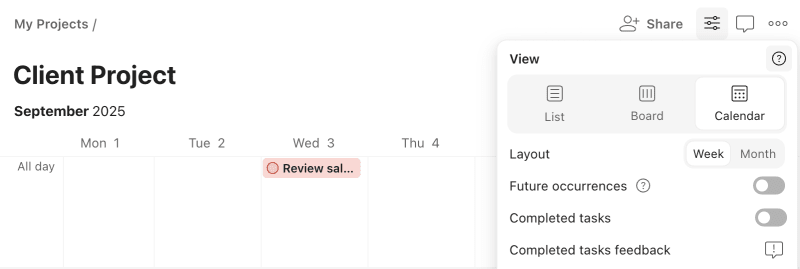
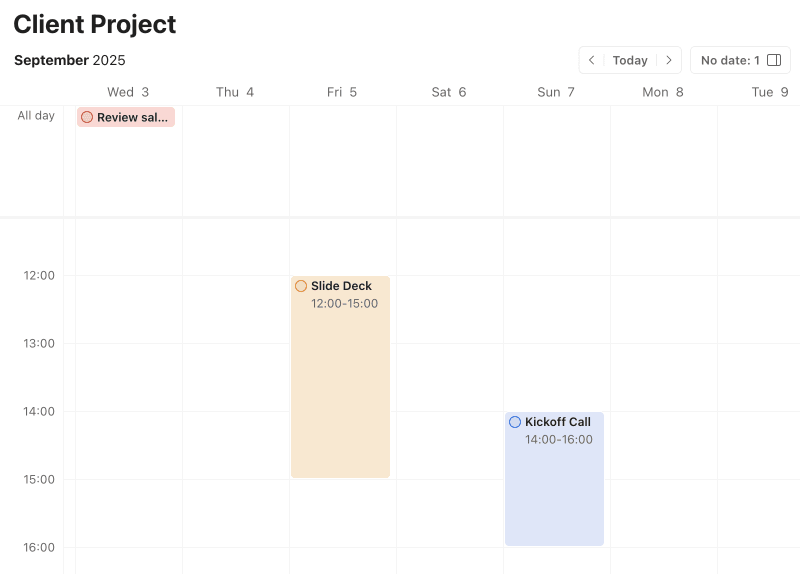
When you need to visualize your weekly or monthly schedule or plan out your day, use the calendar layout. It shows either a weekly or monthly view, giving you a big-picture or a zoomed-in look at your tasks.

You can select the calendar layout at the project level during project creation. You can also adjust the project settings to toggle between calendar, board, and list view at any time.

With the weekly view, you can create time blocks. Time blocking is ideal when you have a lot of projects to juggle, and you need a strategy like day theming, task batching, or time boxing to reclaim your schedule and get things done.

To use this tactic, add tasks to your project. Add windows of time when you’ll work on them or drag them to the calendar and block the time.

As you complete the tasks, you can check them off directly from the calendar layout.

Note

Calendar layout is a paid feature in Todoist’s Pro plan. Compare Todoist’s plans and see which one is right for you.

Task Input & Capture

6. Add emails as tasks from Gmail whether you’re on web or mobile

Many of you already use the Todoist Gmail Chrome extension to turn emails into tasks, but it only works when using Gmail on Chrome.

With the native Gmail Add-On, you can turn emails into Todoist tasks from anywhere you use Gmail — from the Gmail app on your iOS or Android phone or the Gmail web app on any browser. You’ll have more flexibility to add tasks from wherever you are, whenever an idea strikes.

Doist’s Head of Business Development Chase Warrington uses the integration to keep his incoming emails manageable:

“I turn any email that will take more than 5 minutes to answer into a task.”

7. Forward emails to Todoist as new tasks or comments
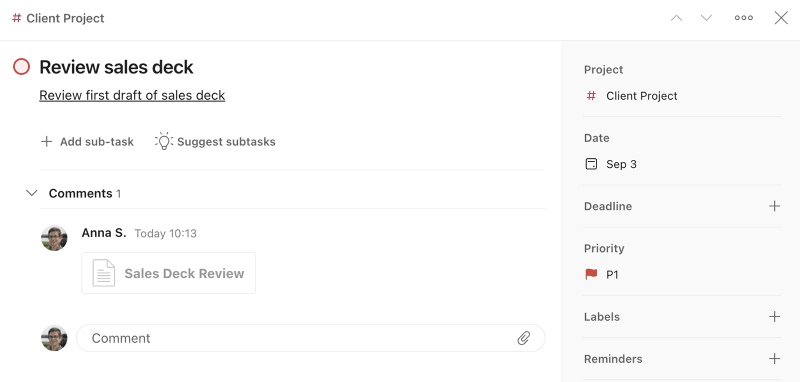
When you’ve got important information in an email and you need to get it into Todoist, forwarding is the fastest way. There are two ways to do this: You can forward an email into a Todoist project to create a new task with the email in the comments, or you can forward the email into an existing task’s comments.

Forward an email into a project: First, follow our directions for getting a unique email address for your Todoist project. You can then forward emails to that address. A new task will be created with the email subject line as the task name and the body of the email will be attached in the task’s comments, including any attachments under 25MB.

Forward an email into a task: First follow our instructions to get a unique email address for a specific Todoist task. Any emails you forward to it will be attached to the task’s comments.

Note

If you don’t want to spend the time getting a unique email addresses for every Todoist project, you can get an email address for your Todoist Inbox, and forward emails there. Once a day, review your new email-based tasks, set due dates, and move them to the right project.

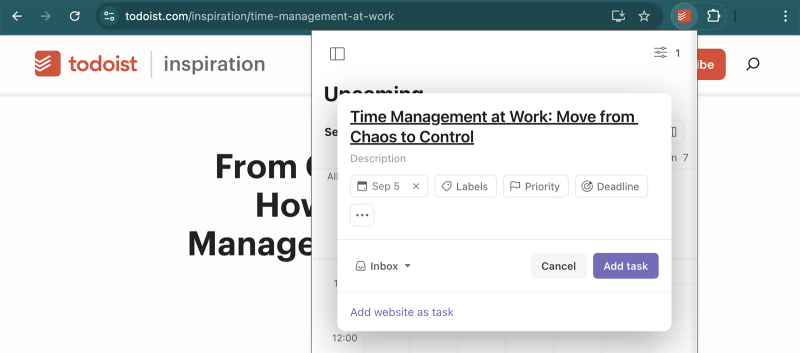
8. Add articles and websites as Todoist tasks using browser extensions

The web holds more information than you could consume in an entire lifetime, which is a blessing and a curse — especially when you need to focus. Let’s fix that.

If you stumble upon a captivating website during deep work — whether that’s an article on how to learn anything or a music video you can’t wait to watch — you can simply add it as a Todoist task that links back to the content.

It’s easy and fast. First, install the browser extension. Then whenever you’re on a page you want to save for later, you can add it as a task in two ways:

  • Click the Todoist icon in your extensions bar. From there click the + button and then Add website as task, where you can add any details before hitting Add task.

Right click anywhere and select Add to Todoist. The task will be added to your Todoist Inbox with a linked site name, allowing you to revisit the page later.

9. Copy and paste multiple lines of text to create new tasks

If you have a list of tasks in plain text — action items from meeting minutes, project timelines, personal notes, article takeaways, etc. — you can copy and paste those lists into Todoist to create separate tasks in seconds.

Simply highlight and copy the lines to your clipboard, open a new task in Todoist, and paste everything into the task field. Todoist will ask if you want to create a new task for each line you copied and pasted.

Just like that, you’ve added 25 new tasks in about three clicks. As a writer and editor, I use this little-known feature all the time for turning outlines into Todoist tasks.

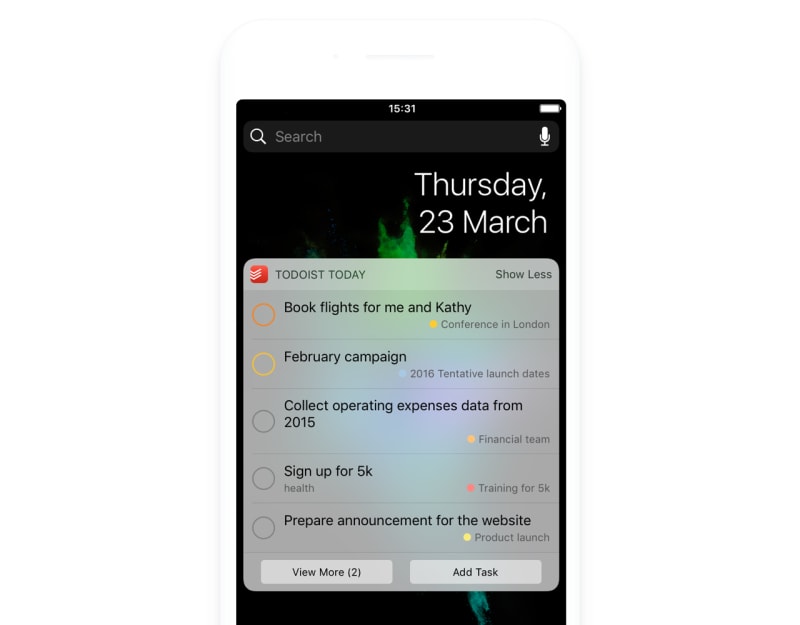
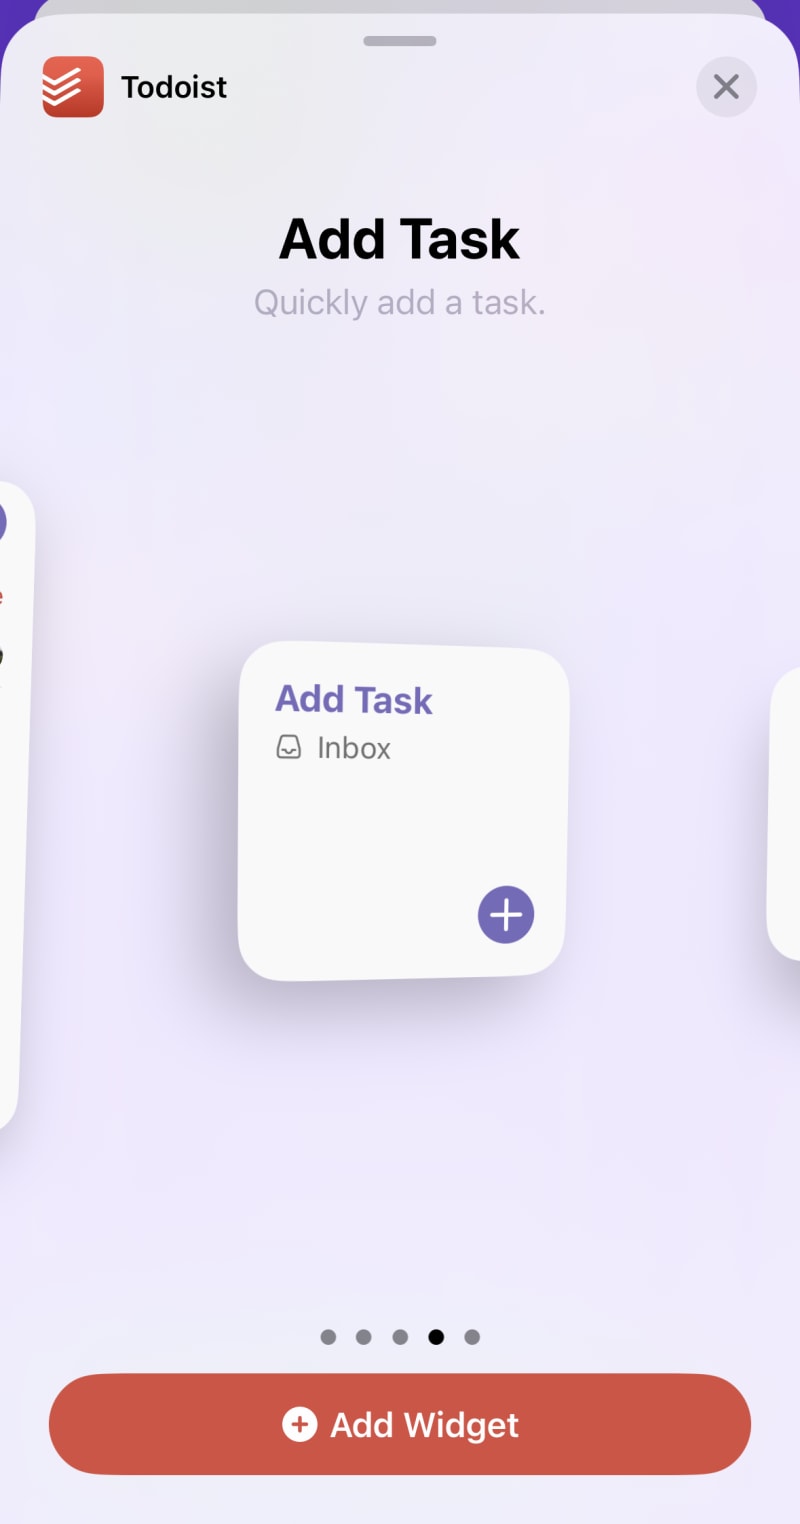
10. Capture tasks on the go with add task shortcuts on iOS & Android

Todoist’s mobile apps let you add and manage tasks from anywhere, but there are various, lesser-known shortcuts on both platforms that let you add tasks even faster. Here are the best ones:

  • [iOS & Android] Share any website to Todoist right from your browser using the share extension. You’ll be able to specify the project, due date, priority level, and more.

  • [Android] Add the Add Task tile to your Quick Settings menu. Android Developer, Pedro Santos uses the Quick Settings tile daily: “It makes adding a task when I'm randomly doing stuff (walking on the street, shopping, etc.) super easy. I don't have to open the app or see my whole list of tasks.”

  • [Android] Add the Add Task widget to your home screen and add a task immediately.

  • [iOS] Long press on the Todoist home screen icon and select `Add Task`.

  • [iOS] Add the Todoist widget to your Widget view.

  • [iOS] Create a shortcut via the Shortcuts app to add a Todoist task to a specific project. Then add the shortcut to your home screen for easy access. For example, I have a shortcut called Shopping List that I use to quickly add items to my household’s shared shopping list project.

11. Use the Quick Add shortcut to create tasks faster

Context switching can derail even the most carefully planned time blocks, causing you to get distracted and shift attention away from what really matters.

Todoist’s Quick Add shortcut lets you make notes and write down ideas the moment you think of them, without making you jump between apps. That means you can create tasks and reminders the moment you think of them — and stop forgetting those moments of brilliance.

Use the standard keyboard shortcut, “Q,” to add a task instantly. Or open your Todoist advanced settings and set your own custom Quick Add shortcut.

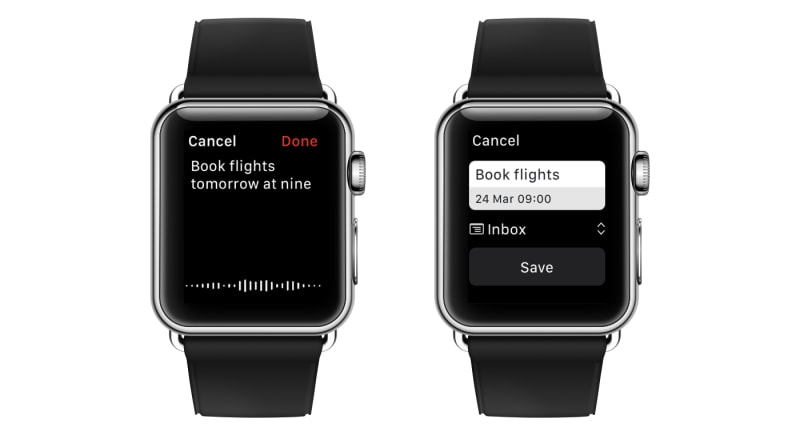
12. Create new tasks with voice commands

Our goal is to help you get tasks out of your mind and into Todoist as fast as possible. No matter where you are or what you’re doing, it should take mere seconds to quickly add a new task and continue on your day.

That’s why we have integrations with all of the major voice assistants, so you can ask Siri, or Alexa to add a new task without ever having to pick up your phone. You can even use natural language to add a due date. Say something like “Siri, add call Gloria next Sunday at 9am to my to-do list” and Todoist will create the new task with the right due date and time.

Voice controls also work with Todoist for Apple Watch and Android Wear so you can dictate new tasks from your wrist.

Note

We also have an integration for iOS Shortcuts so you can create powerful Siri voice shortcuts. For example, add items to your grocery list without having to specify the project every time.

Task Organization & Management

13. Use templates to create reusable project checklists
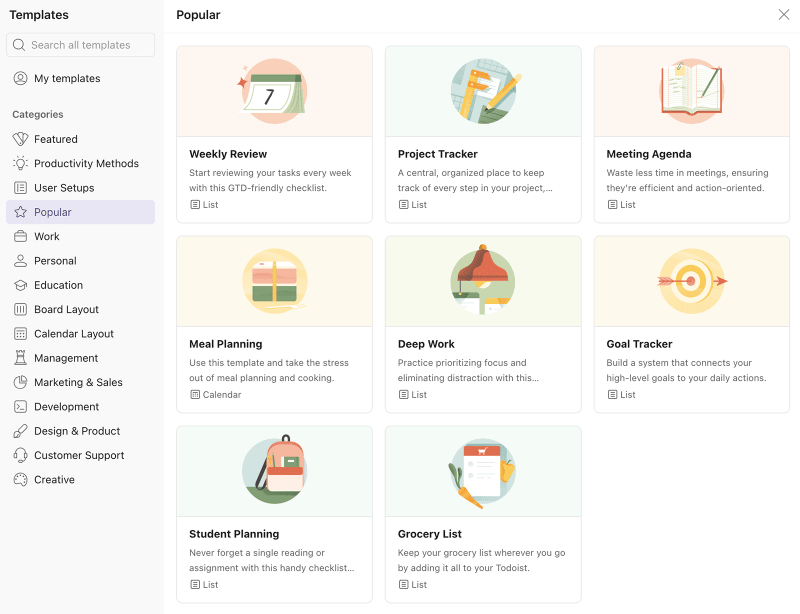
It’s easy to duplicate tasks within a project, but did you know you can duplicate entire projects too? With project templates, you can create, refine, and even share checklists for any project you need to complete on a regular basis.

Here at Doist, we use templates for new feature launches, blog posts, new employee onboarding, and more. And our team also uses them for personal projects like weekly reviews and packing lists.

We’ve put together a repository of popular project templates to get started with. Or you can create your own.

Note

Tip: When you create templates, you can choose to use “relative due dates”. That means if you add a due date for “3 days from now”, that task will automatically have a due date set for 3 days from the day you import the template. With relative due dates, you can recreate complex project timelines in seconds.

14. Drag and drop the “+” button to create tasks, sub-tasks, and sections (iOS & Android)

One of the things I love most about Todoist is how much control you have over your projects. It’s easy to add tasks, sub-tasks, and sections and drag them wherever you need them.

You can drag and drop to create new tasks, sub-tasks, and sections on mobile, too.

Simply press and hold the “+” button in the bottom right and drag it to the spot on the list you want to create a new task. Drag it slightly to the right underneath an existing task to make it a sub-task, or drag it to the far left to make it a new section.

Some tasks need hyperlinks. Some comments require code snippets. Some labels are best expressed in emoji. Luckily, Todoist gives you a number of text formatting options in task, label, and filter names as well as in task and project comments:

  • Bold: **This text will be bold** or __This text will be bold__

  • Italic: *This text will be italic* or _This text will be italic_

  • Bold & italic: ***This text will be bold & italic*** or ___This text will be bold & italic___

  • Hypertext: [This text will be hyperlinked](https://todoist.com/) or https://todoist.com/ (This text will be hyperlinked)

When writing a comment, Todoist also supports the following:

  • Inline code: `this text will be inline code`

  • Code block: ```this text will be in a code block```

You can also simply type what you like, highlight it and a little formatting bar will appear for easy formatting if you don’t feel like remembering all the * and _.

And of course, you can add emojis anywhere you can type text. 😊

A note on hyperlinks: If you copy and paste a URL into a task, Todoist will automatically convert the URL to the title of the page and make it clickable without any special formatting. Doist’s founder and CEO Amir Salifhefendic takes advantage of this feature daily:

“I have a project called Articles where I add links, and Todoist converts them to article titles I want to read.”

Note

Since special text formatting isn’t supported in project names, an emoji shortcode like :joy: won’t work. But you can still add emojis using your phone’s default emoji keyboard. On Mac, use the keyboard shortcut Control + Command + Space Bar to select from a full emoji menu. On Windows, access a full emoji keyboard from the Touch Keyboard on any device, or using Windows + . on Windows 10. Or you can always copy and paste emojis into the project name from a website like Emojipedia.

16. Set deadlines to track actual due dates 🔒

Need a better way to keep track of when tasks are really due so you can better plan your workload throughout the week or month? While due dates reflect when you’re planning to complete tasks, deadlines show when projects must be completed.

You can set both a due date (i.e., when you’ll work on it) and a deadline (i.e., when you have to deliver it) for any task.

Use the due date when you want to time block a task. And use the deadline when you need a firm reminder pinned to the date in question. The deadline automatically disappears from your calendar view when you check off the task and all its sub-tasks.

Note

Deadlines are a paid feature in Todoist’s Pro plan. Compare Todoist’s plans and see which one is right for you.

17. Break down big goals with AI Assistant 🔒
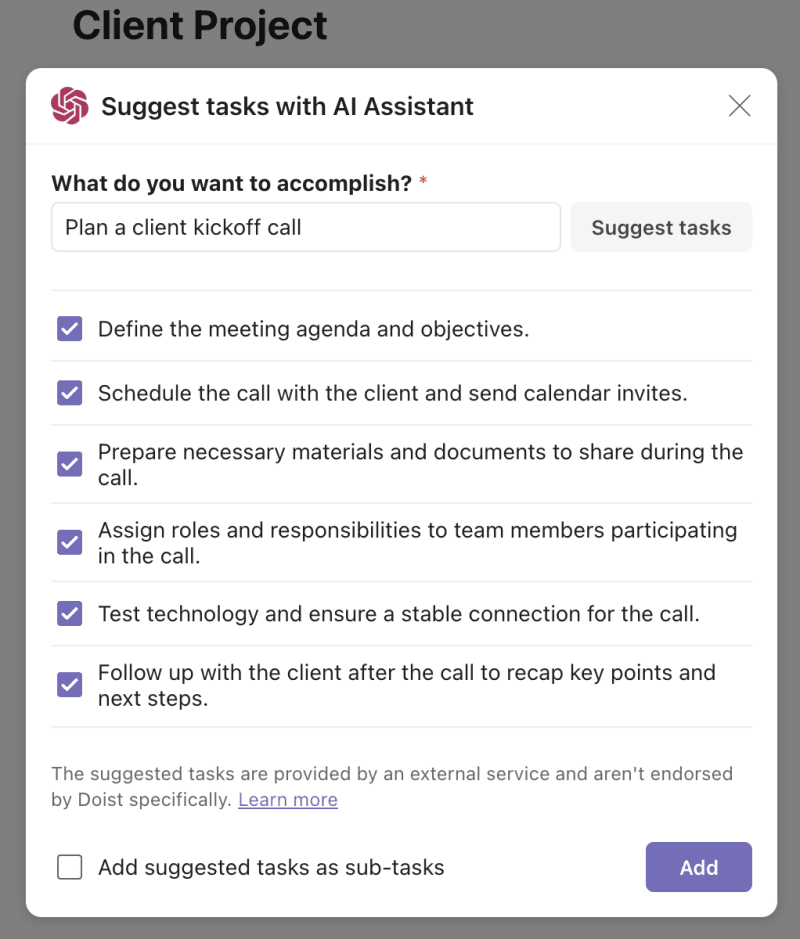
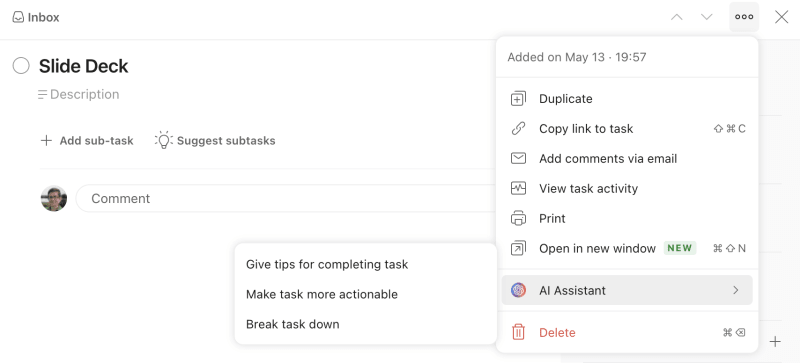
Planning big projects with many moving parts can be overwhelming. How granular should you get? Are you missing key steps? Where should you even start?

You don’t have to plan alone. Todoist’s AI Assistant can help.

To enable this tool, first open Todoist on the web or in the desktop app. Then, go to Settings > Integrations and select AI Assistant.

Once installed, you can access AI Assistant from the menu of any project. Tell it what you want to accomplish, and it will generate a list of tasks.

You can also use AI Assistant for tasks. Prompt it to make the task more actionable, get tips to complete the task, or break it into smaller pieces.

Then, you can accept AI Assistant’s recommendations, add its tips as a comment, or turn the suggested steps into sub-tasks with one click.

Note

AI Assistant is a paid feature in Todoist’s Pro plan. Compare Todoist’s plans and see which one is right for you.

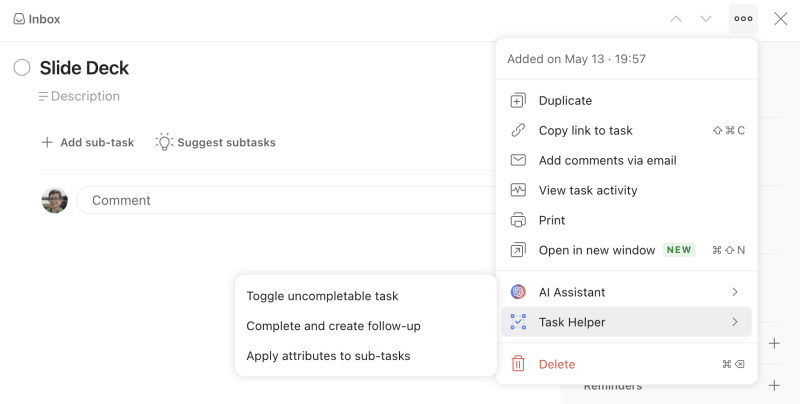
18. Update multiple tasks in seconds with the Task Helper extension

Ideally, your task management process saves you time instead of creating more manual work. With the Task Helper extension, you can set up tasks exactly how you need to without the extra work.

Like AI Assistant, Task Helper requires a quick installation. Open Todoist in a browser or a desktop app, and go to Settings > Integrations. Search for Task Helper and complete the installation.

Then, open Task Helper from the menu of any task. From here, you can:

  • Make the task uncompleteable so it remains on your to-do list

  • Create a follow-up task immediately after you complete it

  • Apply task attributes across sub-tasks

Scheduling & Reminders

19. Set due dates to recur based on the last completion date
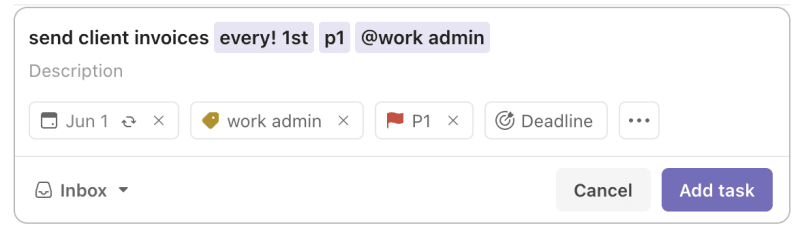
As the task manager with the smartest date recognition on the market, Todoist can recognize any recurring due date you type into it, from “every weekday” to “every 3rd Tuesday” to “every 3rd of the month starting Apr 1 and ending Oct 13”.

What you may not know is that you can also set a date to recur based on when a task was last completed. For example, I have a task called “send client invoices” that I want to do every month. However, it’s a task that I often put off.

If I set the date for “every month starting feb 1”, the task will reset for March 1 even if I complete it on February 28. But I don’t need to balance my account again just 3 days later. 

Instead, I can use “every!” as in “every! month starting feb 1”, and when I complete the task on February 28 the next date will be set for March 28.

Using “every!” in recurring dates is perfect for those tasks that need to be completed on a regular basis but not on a specific day.

Note

Tip: Todoist’s smart task Quick Add recognizes more than just due dates. Use shortcuts to specify a project, add labels, set a priority level, and/or assign a task to a collaborator. Learn more about smart Quick Add.

20. Never forget a task with automatic and location-based reminders 🔒
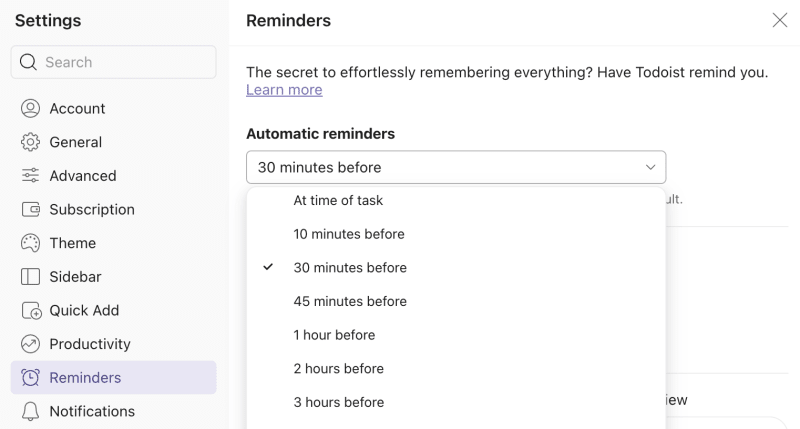
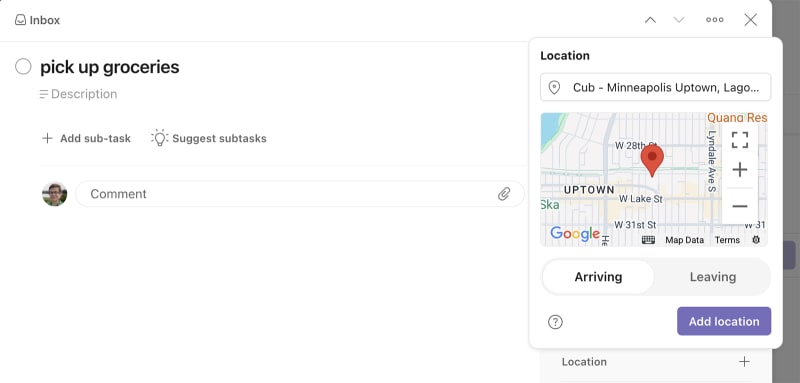
Task reminders may not qualify as a “little-known” feature, but some of the ways you can customize them aren’t so obvious.

By default, Todoist will automatically send a reminder for any task that has a due date and time. That way, you don’t have to remember to manually set a reminder yourself. In your reminder settings, you can customize how long before a due time the automatic reminder will be sent. You can pick anywhere from 0 minutes to 1 week before the task is due.

You can also set a location-based reminder. Doist’s Integrations Developer, Willian, uses this feature to make sure he doesn’t forget to buy things on his way past the grocery store:

“I have an incompletable task with a location reminder for the local grocery store. Every time I'm nearby, I receive a notification to check my grocery list.”

Note

Reminders are a paid feature in Todoist’s Pro plan. Compare Todoist’s plans and see which one is right for you.

21. Use project calendar feeds to visualize tasks in any calendar app

You may already know you can sync Todoist with Google Calendar. But you can also get a calendar feed for any project and import it into your calendar app of choice including Apple, Outlook, and Google Calendar).

Any changes you make in the project will automatically be reflected in your calendar app. And because your tasks show up in a separate calendar, you’ll be able to toggle them on and off.

Doist Product Designer, Panos, uses this feature to better visualize financial deadlines:

“Even though I knew it existed, I only recently started using “project calendar feeds”. Specifically, I have a project where I list all my financial obligations. So far I’ve been using a filter that would give me an overview within Todoist of what’s coming in the next 7 days. But now with a project calendar feed, I’m able to see a weekly or monthly overview of everything within Fantastical.”

You can even share project feeds with others so they can follow along in their own calendars too. At Doist, we use this feature to share the content calendar for Inspiration and our product roadmaps for Todoist and Twist.

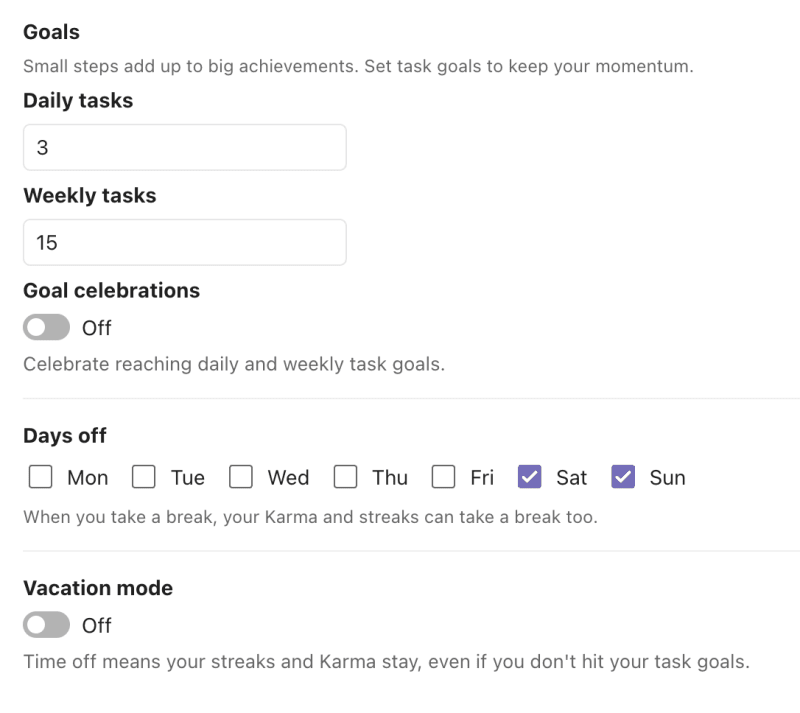
22. Customize goals and turn on Vacation Mode to preserve goal streaks

Todoist’s Karma system gamifies your productivity by awarding you points for how much you complete, docking points for tasks that are overdue, and keeping track of your daily and weekly task streaks. Building up daily and weekly task streaks can be a fun and addicting way to ensure you’re making progress on your tasks every day.

As you get more productive, level up your streaks by increasing your daily and weekly task goals. If you’re not getting as much done as you’d like, turn it to easy mode and reduce those goals.

Finally, don’t forget to turn on Vacation Mode when you want to disconnect from it all. Your daily and weekly streaks will be preserved until you get back. Find all your Karma options in the Productivity tab of your Todoist settings.

Collaboration & Automation

23. Share a project with a colleague for easier collaboration 🔒
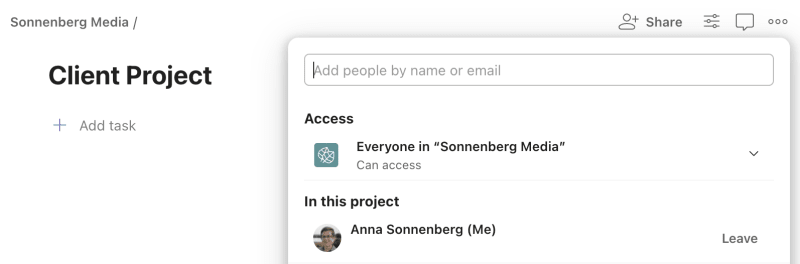
There’s no need to work on big projects alone. Instead, share them with colleagues so everyone can work together, tackle tasks on schedule, and leave comments to keep the team in the loop.

In the project view, click the Share button in the upper right corner. You’ll see a list of the team(s) and people who already have access to the project. You can type other collaborators’ names or emails to share the project with more people.

Note

Shared team workspaces are a paid feature in Todoist’s Business plan. Compare Todoist’s plans and see which one is right for you.

24. Automate tasks with IFTTT or Zapier

Not surprisingly, when asked what his favorite, little-known Todoist feature was, our Integrations Developer, Willian, said “the smart usage of integrations”. While Todoist has dozens of useful integrations already, you can also build your own app connections and automations with aggregators like IFTTT and Zapier.

Here’s Willian on IFTTT:

“I'm currently using IFTTT to build a list of things I did during the week, so I can report on Friday. Every time IFTTT sees a completed task with the @snippet label, it creates another task in a separate Snippets project. At the end of the week, I can screenshot the project list or select print and export it as a PDF I can share with the team.”

That's just a glimpse of what's possible: Try integrating Todoist with other apps using IFTTT and Zapier and find what works for you.

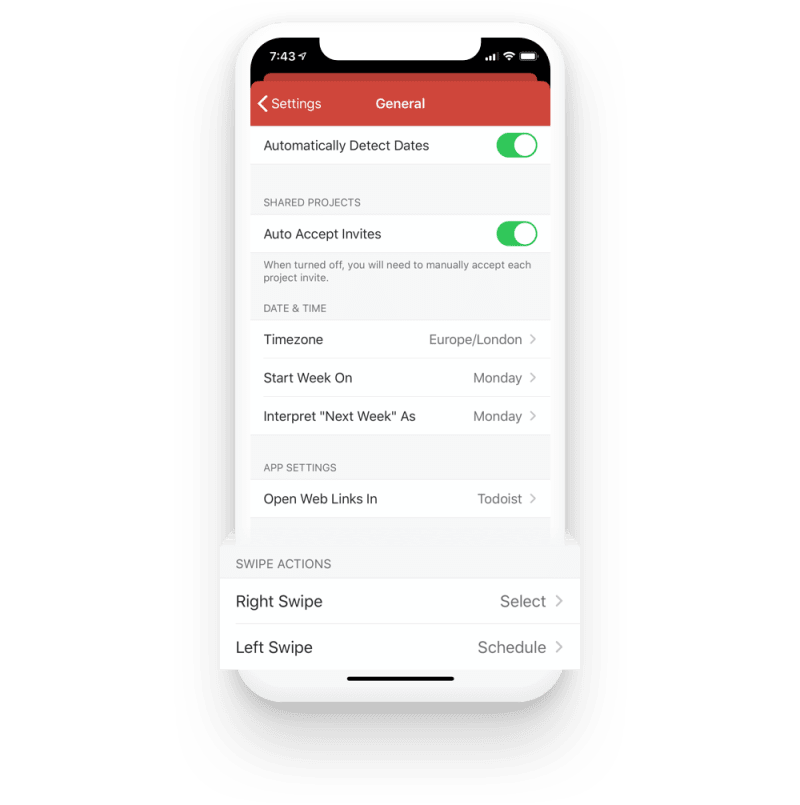
25. Customize your swipe gestures (Android & iOS)

In Todoist, you can customize the all-powerful swipe gesture so whenever you swipe left or right on a task, Todoist performs one of a number of actions.

You can choose to swipe to either schedule the task, complete the task, delete the task, or select the task (especially handy if you often need to edit multiple tasks at once).

26. Auto-sync with your device’s dark mode (Android & iOS)

As much as we love Todoist’s classic look, it isn’t the only option. Todoist now offers several themes, including a handful for Pro users.

To keep this look consistent between devices, you can automatically sync the theme. You can also opt to sync Todoist with your device’s dark mode on both Android and iOS.Go to Settings > Theme and make sure  “Sync Theme” and “Auto Dark Mode” (“Auto dark theme” on Android) is turned on. Then enjoy not being blinded by an unexpected white screen at the end of the day.


We hope you found some helpful tidbits in this list to make your task management faster, more organized, and more personalized.

Becky Kane

Editor, Doist

Bring order to your work and life

Join millions of people who are finally feeling the relief of getting organized.

Get Started for Free

We respect your privacy