This quick-start guide will show you how to get a simple Todoist UI Extension running in no time.
We will build a simple context menu Extension that displays a button which, upon clicking, displays a notification for the user.
Let’s get started! 🚀
Notitie
Node.js and npm installed yet, please follow the installation guide first.
Let's start by installing some packages (see below):
npm init -y
npm install express nodemon ts-node typescript @doist/ui-extensions-core
npm install @types/express @types/node --save-dev
Create your own integrations service
Now, onto our favorite IDE and let's create an app.ts file that will act as our controller, answering all incoming requests and replying to them.
Note that our controller listens on port 3000 and replies to requests to the /process endpoint, but you can change these if you want.
Our newly created controller returns a Doist Card with some text ('Hello, my friend!') and a button with some text ('Click me!') that triggers another action (Action.Submit).
app.ts
import { DoistCard, SubmitAction, TextBlock } from '@doist/ui-extensions-core'
import express, { Request, Response, NextFunction } from 'express'

const port = 3000
const app = express()

const processRequest = async function (
    request: Request, response: Response, next: NextFunction
) {
    // Prepare the Adaptive Card with the response
    // (it's going to be a form with some text and a button)
    const card = new DoistCard()
    card.addItem(TextBlock.from({
        text: 'Hello, my friend!',
    }))
    card.addAction(
        SubmitAction.from({
            id: 'Action.Submit',
            title: 'Click me!',
            style: 'positive',
        }),
    )

    // Send the Adaptive Card to the renderer
    response.status(200).json({card: card})
}

app.post('/process', processRequest)

app.listen(port, () => {
    console.log(`UI Extension server running on port ${port}.`)
});
Run your integration service
Add a simple script to your package.json:
npm run dev
Now you're ready to run a single command in your terminal:
npm run dev
Expose your localhost
Now, in order for Todoist to be able to communicate with your integration, we need to expose your service to the internet. There are a couple of tools available to create this kind of tunnel:
ngrok http 3000
For example, if you choose to use ngrok, you'll be running some variation of the following command (we chose to listen on port 3000):
Take note of the URL exposed by your tool of choice, as you'll need it in the next step (i.e. https://my-extension-service).
Create a Todoist App
Finally, we want to create a Todoist App:
- Visit the App Management Console (you'll be prompted to log in if you're not already)
- Click "Create a new App" and insert a name in the "App name" field (i.e. "My first app")
- In the
UI Extensionssection, click "Add a new UI extension" (it should look like the screenshot on the right):- Give it a name (i.e. "Greet me!")
- Select "Context menu" as the "Extension type" (and "Project" as the "Context type")
- Point "Data exchange endpoint URL" to your service URL followed by
/process(or the endpoint name you chose when creating your own integrations service). This value in this field might look something likehttps://my-extension-service/process
- In the
Installationsection, click on theInstall for mebutton

Use your UI Extension
Now, for the fun part!
- Visit Todoist.
- Select any of your Todoist projects (or create a new one).
- Click on the context menu icon of that project, select "Integrations" and finally select your UI Extension from the list (i.e. "Greet me!").
Congratulations, you just built and used your first Todoist UI Extension! 🎉
Iterate
Err, our new button doesn't really do much, does it? Well, let's change that.
This time we're going to check the actionType (and actionId) that's part of the incoming request:
- If it's the initial request to our UI Extension, then we want to display the simple text and then button.
- If it's a subsequent request (triggered by clicking on the button), then we want to return a notification to the user and terminate the extension flow.
To communicate to the renderer that we want to display a notification, we return a list of bridges, which are requests to execute a specific action on the client-side. In this case, we choose to return a display.notificationbridge and a finishedbridge, since we want to display a notification message to the user and also terminate the extension flow.
After making a few code changes, you can test your extension again and be delighted by the notification that pops up once you click on your button:
Code Examples
- You can find the code we just wrote at Getting Started Extension.
- If you want to browse (and run) an integration with more extensive functionality, including receiving and using Todoist API tokens and creating different types of UI extensions, check out our Lorem Ipsum Extension.
- At Doist, we use NestJS for our UI Extensions, as it allows us to efficiently build new integrations. We have an open-source SDK with NestJS-specific modules that you can use to develop your own UI Extensions. We have open sourced our Export to Google Sheets integration so that you can see how we use this SDK.
- If you're missing a sample for the problem you're trying to solve, please contact us (select "Something else" and then "Integrations Development") to let us know! Alternatively, consider creating a pull request with the sample against our repo, we're (gladly) accepting contributions.
Next steps
- If you jumped straight to this section, you can go back and review our Introduction and learn about the basics of UI Extensions.
- If you want to do more than displaying buttons and notification, learn more about Returning UIs and Action bridges.
- If you want to make sure the incoming request is from Todoist (and not a third-party application), check out Security.
- If you want to add other types of UI Extensions (i.e. Composer, Settings), take a look at Adding a UI Extension.
Handling user requests
Client and User Information
Each request made from the Todoist client to your extension will contain information about the client that sent the data, as well as information about the user who triggered the request.
This is called the Data Exchange Format and establishes what the integration service can expect in the client request:
- Extension Type (
extensionType) - Identifies the type of the extension (context-menu,composerorsettings). - Context (
context) - Information about the environment and the user that's using the extension. - Action (
action) - Identifies the type of action the user has executed on the client. - Maximum Doist Card Version (
maximumDoistCardVersion) - Identifies the maximum Doist Card version that the client can support. This can allow your extension to send back differing UI elements based on what the client supports.
Extension type
The extension type depends on where the user has invoked said extension. Supported values are:
- Context Menu (
context-menu) - Composer (
composer) - Settings (
settings)
Context Menu
The user can access these integrations from the context menu of a project or task. Developers can specify if their context menu extension should appear in the context menu of either a project or task when creating a new Adding a UI Extension, acting of the Context type field.
Context menu extensions also provide some additional data, like the source in the action.params field (see action).
Composer
The user can access these integrations from the composer extensions menu of a task or comment. Developers can specify if their composer extension should appear in the composer extension menu of either a task or comment when creating a new Adding a UI Extension, acting of the Composer type field.
Settings
If the extension type is settings this means it has been triggered from within Todoist's in-app settings. Developers can choose to display there any settings the user can change for the current extension.
A settings extension is great for occasions where there's no other place to put your extension's settings. One example are extensions that don't have any user interface.
While each integration can have more than one context menu and composer extension, it can only have one settings extension.
Context
We send context information with every request to the integration service. It contains:
Theme
This will be the theme of the calling application, either light or dark.
User
It contains the current user that invoked the integration.
A subset of Todoist's user fields:
short_nametimezoneidlangfirst_namenameemail
Platform
This will be the platform that the client is making the request from and can be used by the integrations to tailor their UI to the platform requesting. This is an optional field and can be either desktop or mobile.
Todoist
Todoist-specific context items. These are information about where in Todoist the request was made.
Project
It contains the current project from which the user has triggered the extension. It will be populated only if the user invoked the extension from a project view.
A subset of Todoist's project fields:
idname
Filter
It contains the current filter from which the user has triggered the extension. It will be populated only if the user invoked the extension from a filter view.
A subset of Todoist's filter fields:
idname
Label
It contains the current label from which the user has triggered the extension. It will be populated only if the user invoked the extension from a label view.
A subset of Todoist's label fields:
idname
Additional User Context
Additional context about the user who triggered the request:
isPro:trueif the user is on a Todoist Pro plan,falseotherwise
Action
We use the action to signal to the server what kind of interaction does the user expects.
We support the following types of interactions:
Other than the mandatory actionType, the action object can contain various different fields, depending on the type of the action.
Initial
The initial action type tells the server that the user has just opened the integration and expects to see the first screen in the workflow.
In the case of context menu extensions, there will be additional data being sent as part of the initial request, which will live in the params field.
Params
| Name | Description |
|---|---|
source String | This will be either project or task. |
url String | This will be the deep link url to the project/task. |
sourceId String | This is the id of the project/task. |
content String | For the following, this will be:
|
contentPlain String | This will be a stripped-down version of the content, with all markdown formatting removed. |
Submit
Whenever a user presses a button, for example, Todoist will send all the fields the user has filled out, checked or interacted with, back to the server, using the Action.Submit action.
Whenever a user executes an action via the Action.Submit action on the form; the following will be sent to your integration:
- All
Input.*fields in the form of{"inputId": "inputValue"} - All
dataproperties of the Submit element
An actionId should be supplied with the request as the submit action on its own may not be very clear as to the action's intended consequence.
Maximum Doist Card Version
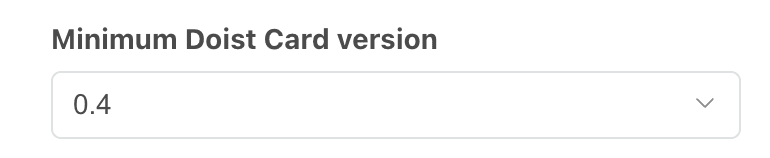
This is the maximum version of Doist Card that the requesting client can support. The client will send this field to requests cards that can be successfully displayed on the client itself.
An example of why this is needed is if a user hasn't been able to update to the latest version of Todoist that supports the latest version of Doist Card. In this case, the extension can send back a card that will be supported by that version of the client application. Should the extension not support a lower version of Doist Card, the extension should set the Minimum Doist Card version when creating their extension in the App Management Console:
Security
In order for your extension to confirm that the request was made from Todoist and not from a potentially malicious actor, each request will include an additional header: x-todoist-hmac-sha256.
This is a SHA256 HMAC generated using the integration's verification token as the encryption key and the whole request payload as the message to be encrypted. The resulting HMAC would be encoded in a base64 string.
To verify that the request is from a trusted source (Todoist) you need to compare it with the verification token value of your integration, which you can get from your app settings in the App Management Console.
Here you can see a simplified example of how you can validate this header, where:
verificationToken(string) is your verification token from App ConsolerequestHeaders(http.IncomingHttpHeaders) are the headers from the incoming requestrequestBody(Buffer) is the raw body of the incoming request
You can also see this code in action in our Lorem Ipsum Extension.
Full Client Request Example
The full request that the client makes to the server can look as follows:
Context Menu Extension
{
   "context":{
      "theme":"light",
      "user":{
         "email":"janedoe@doist.com",
         "timezone":"Europe/Rome",
         "id":4939878,
         "name":"Jane Doe",
         "first_name":"Jane",
         "short_name":"Jane",
         "lang":"en"
      },
      "todoist":{
         "project":{
            "id":"2299753711",
            "name":"Test project"
         },
         "additionalUserContext":{
            "isPro":true
         }
      },
      "platform":"desktop"
   },
   "action":{
      "actionType":"initial",
      "params":{
         "content":"Test project",
         "sourceId":"2299753711",
         "source":"project",
         "url":"https://app.todoist.com/app/project/2299753711",
         "contentPlain":"Test project"
      }
   },
   "extensionType":"context-menu",
   "maximumDoistCardVersion":0.6
}
Composer Extension
{
   "context":{
      "theme":"light",
      "user":{
         "email":"janedoe@doist.com",
         "timezone":"Europe/Rome",
         "id":4939878,
         "name":"Jane Doe",
         "first_name":"Jane",
         "short_name":"Jane",
         "lang":"en"
      },
      "todoist":{
         "project":{
            "id":"2299753711",
            "name":"Test project"
         },
         "additionalUserContext":{
            "isPro":true
         }
      },
      "platform":"desktop"
   },
   "action":{
      "actionType":"initial"
   },
   "extensionType":"composer",
   "maximumDoistCardVersion":0.6
}
Settings Extension
{
   "context":{
      "theme":"light",
      "user":{
         "email":"janedoe@doist.com",
         "timezone":"Europe/Rome",
         "id":4939878,
         "name":"Jane Doe",
         "first_name":"Jane",
         "short_name":"Jane",
         "lang":"en"
      },
      "platform":"desktop"
   },
   "action":{
      "actionType":"initial"
   },
   "extensionType":"settings",
   "maximumDoistCardVersion":0.6
}
Returning UIs and Action Bridges
When the integration service responds to the client requests, it needs to send several vital pieces of information:
- UI (
card) - Thecardis what contains the UI JSON that the Todoist client will render for the user. - Client-side Actions (
bridges) - This field is an array ofbridges(request for the client to perform specific actions on the extensions' behalf, such as inject text into the composer or display a notification). The bridges will be executed in the order in which they appear in the array.
Note that both properties (card and bridges) can present at the same time, but at least one must always be filled out.
UI
In most cases, the extension will instruct the client to display a UI rendered as a Doist Card.
{
  "card": {
    "type": "AdaptiveCard",
    "body": [{
        "text": "Welcome, my friend!",
        "type": "TextBlock"
    }],
    {...}
  }
}
Client-side Actions
In some cases, the extension also need to ask the client to execute actions within the app itself. These requests for actions are called bridges.
Currently, we support the following bridge action types (bridgeActionType):
- Display Notification (
display.notification) - Append Text to Composer (
composer.append) - Trigger a Todoist sync (
request.sync) - Extension has finished (
finished)
An extension can send multiple bridges as part of the response and the client will execute each bridge in order. See the example on the right of an extension that is instructing the client to add text to the composer and then to close the extension:
Display Notification
Extensions can issue requests to display a lightweight notification as an alternative to a full card. This is a great choice for quick messages. In this case, the response will include the following property:
notification: notification that will be displayed to the user.
Notification
Properties
| Name | Description |
|---|---|
text String | This is the text to appear in the notification. This should be plain text, Markdown is not supported here. |
type String | This will be either info, success or error. |
actionUrl String | (Optional) This is the action URL that will be opened if actionText is clicked. |
actionText String | (Optional) This is the text to be displayed for the action. This should be plain text, Markdown is not supported here. |
Note: For the notification to display an action, bothactionUrl and actionText must be provided.
Append to Composer
Upon receiving a composer.append action bridge, the client will append the specified text into the Todoist text composer:
text: text to append at the end of the current message
Request Todoist Sync
When the extension issues a request.sync, the client will perform a Todoist sync. In this case, the supported properties are:
onSuccessNotification: notification that will be displayed to the user in case the Todoist sync is successfulonErrorNotification: notification that will be displayed to the user in case the Todoist sync is not successful
Extension has finished
When the finished bridge is sent back, it's a way for the extension to tell to the client that the extension has finished its lifecycle and it should be closed.
Full Server Response Example
{
   "card":{
      "$schema":"http://adaptivecards.io/schemas/adaptive-card.json",
      "adaptiveCardistVersion":"0.6",
      "body":[
         {
            "columns":[
               {
                  "items":[
                     {
                        "id":"title",
                        "size":"large",
                        "text":"Export **Test project**",
                        "type":"TextBlock"
                     }
                  ],
                  "type":"Column",
                  "verticalContentAlignment":"center",
                  "width":"stretch"
               },
               {
                  "items":[
                     {
                        "columns":[
                           {
                              "items":[
                                 {
                                    "altText":"View Settings",
                                    "height":"24px",
                                    "selectAction":{
                                       "id":"Action.Settings",
                                       "type":"Action.Submit"
                                    },
                                    "type":"Image",
                                    "url":"https://td-sheets.todoist.net/images/shared/Settings-light.png",
                                    "width":"24px"
                                 }
                              ],
                              "type":"Column",
                              "width":"auto"
                           }
                        ],
                        "type":"ColumnSet"
                     }
                  ],
                  "type":"Column",
                  "width":"auto"
               }
            ],
            "spacing":"medium",
            "type":"ColumnSet"
         },
         {
            "items":[
               {
                  "id":"options-header",
                  "isSubtle":true,
                  "text":"Choose which fields you want to export.",
                  "type":"TextBlock"
               },
               {
                  "columns":[
                     {
                        "items":[
                           {
                              "id":"Input.completed",
                              "title":"Is completed",
                              "type":"Input.Toggle",
                              "value":"true"
                           },
                           {
                              "id":"Input.due",
                              "title":"Due date",
                              "type":"Input.Toggle",
                              "value":"true"
                           },
                           {
                              "id":"Input.priority",
                              "title":"Priority",
                              "type":"Input.Toggle",
                              "value":"true"
                           },
                           {
                              "id":"Input.description",
                              "title":"Description",
                              "type":"Input.Toggle",
                              "value":"true"
                           }
                        ],
                        "type":"Column",
                        "width":"stretch"
                     },
                     {
                        "items":[
                           {
                              "id":"Input.parentTask",
                              "title":"Parent task",
                              "type":"Input.Toggle",
                              "value":"true"
                           },
                           {
                              "id":"Input.section",
                              "title":"Section",
                              "type":"Input.Toggle",
                              "value":"true"
                           },
                           {
                              "id":"Input.assignee",
                              "title":"Assignee",
                              "type":"Input.Toggle",
                              "value":"true"
                           },
                           {
                              "id":"Input.createdDate",
                              "title":"Created date",
                              "type":"Input.Toggle",
                              "value":"true"
                           }
                        ],
                        "type":"Column",
                        "width":"stretch"
                     }
                  ],
                  "type":"ColumnSet"
               },
               {
                  "isSubtle":true,
                  "text":"The following fields are always exported: Task Id, Task Name, Section Id, and Parent Task Id.",
                  "type":"TextBlock",
                  "wrap":true
               }
            ],
            "spacing":"medium",
            "type":"Container"
         },
         {
            "columns":[
               {
                  "items":[
                     {
                        "actions":[
                           {
                              "id":"Action.Export",
                              "style":"positive",
                              "title":"Export",
                              "type":"Action.Submit"
                           }
                        ],
                        "type":"ActionSet"
                     }
                  ],
                  "type":"Column",
                  "width":"auto"
               }
            ],
            "horizontalAlignment":"right",
            "spacing":"medium",
            "type":"ColumnSet"
         }
      ],
      "doistCardVersion":"0.6",
      "type":"AdaptiveCard",
      "version":"1.4"
   }
}
Adding a UI Extension
Extensions can be added to integrations in the App Management Console. An integration can have multiple UI extensions added to it. More specifically, multiple context menu extensions and composer extensions are allowed, however an integration can only have one settings extension.
Users cannot show/hide specific extensions for an integration.
To add an extension, you need to create a new App first:

Then from the UI Extensions section, click on "UI Extensions":

Context Menu and Composer Extensions Menu
If you're looking to create an extension that appears in the context menu or composer extensions menu, click the "Add a new UI extension" button. Then, enter the details of your extension.
It is recommended to have an extension name with fewer than 29 characters to avoid truncation within Todoist's context menu.
Once you create an extension, you can also add an icon to it. This icon will be the image that appears in the context menu or composer extensions menu and not the integration's image (as you can have multiple extensions, you might want different icons for each of the extensions).

Properties
| Name | Description |
|---|---|
| Name | The name for your UI Extension, it will appear in the context menu or composer extensions menu. |
| Description | This will appear as the sub-text in the composer extensions menu if the extension is a composer extension. |
| Extension type | Either Composer or Context menu. |
| Context type | Displayed only if Extension type is Context menu. Either Project or Task. |
| Composer type | Displayed only if Extension type is Composer. Either Task or Comment. |
| Data Exchange Format version | The version of the Data Exchange Format your extension accepts. See ref. |
| Data exchange endpoint URL | The url for your integration service and where the requests will be sent from Todoist. |
| Minimum Doist Card version | The minimum Doist Card version your extension supports. For example, some older mobile clients might not support all the features required by the latest Doist Card version and will leverage this field to decide if the extension should be displayed for the user or not. |
Settings Extensions
Use the "Add a settings extension" button to add a settings extension. Remember: an integration can only have one of these.

Properties
| Name | Description |
|---|---|
| Data Exchange Format version | The version of the Data Exchange Format your extension accepts. See ref. |
| Data exchange endpoint URL | The url for your integration service and where the requests will be sent from Todoist. |
| Minimum Doist Card version | The minimum Doist Card version your extension supports. For example, some older mobile clients might not support all the features required by the latest Doist Card version and will leverage this field to decide if the extension should be displayed for the user or not. |
Short-lived Tokens
If your integration service has a need to call the Todoist REST API or Sync API during the UI Extension lifecycle, you don't need to implement the OAuth flow in your extension.
Instead, you can configure Todoist to include a short-lived access token in the requests sent to your integration service, which you can then use in the same way you would use an access token obtained through the OAuth flow.
These tokens have a limited lifetime, on the span of a few minutes.
If you wish to use the Todoist API to query or manipulate user data outside the UI Extension lifecycle, you must implement the OAuth flow into your extension.
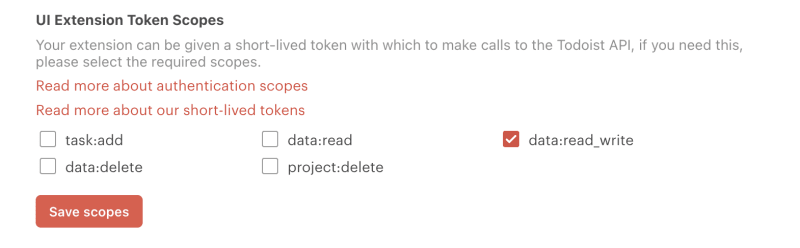
Enabling Short-lived Tokens
You can enable these tokens by selecting the authorization scopes needed by your integration in the UI Extensions section of your app in the App Console:
Once enabled, users who install your integration (and users who use your integration for the first time after scopes are changed) will be presented with a consent flow:
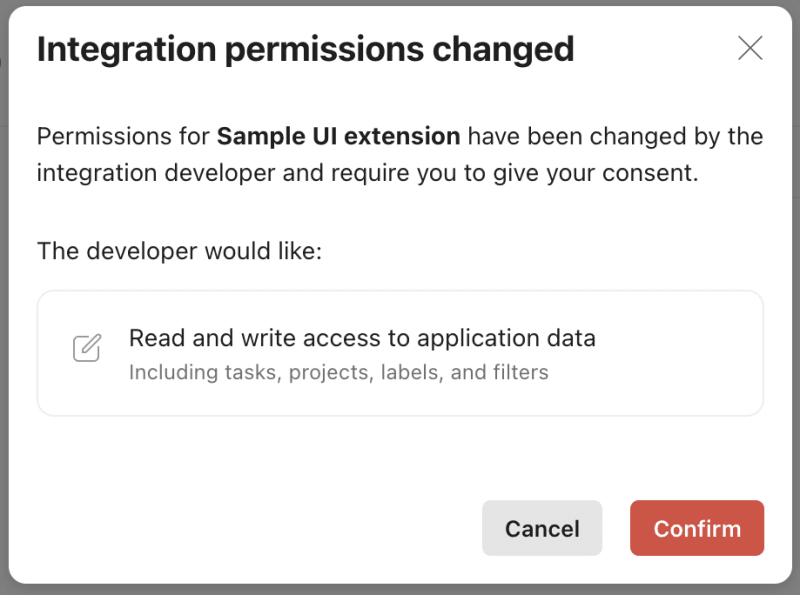
Once the user has consented to those scopes, the token will be included in the x-todoist-apptoken header in all requests sent to your integration service.
Get in touch
If you still have questions about UI extensions or want to learn more, get in touch with us.